
官方文档: 传送门
pdf下载 : 传送门
Spring Web MVC (Model-View-Controller) 框架是围绕着 DispatcherServlet 设计用于处理请求的框架(使用可配置的处理器映射,视图方案,区域,时区,主题方案,并且对文件上传有较好的支持).
在spring web mvc 中可以使用任何对象作为一个命令或者表单后盾对象,不需要实现框架指定的接口或者基类. spring的数据绑定高度灵活: 例如 处理类型匹配错误作为验证错误, 可以由应用来评估, 而不是作为系统错误,从而可以尽量简单使业务对象属性不再重复,没有类型的字符串在表单对象中可以简单的处理验证提交, 或者转换成字符串属性,代替的是,常常最好是直接绑定业务对象.
spring 的视图方案是非常灵活的.一个Controller可以用一个数据Map和一个视图名称来作为请求应答,也可是直接把数据写入输出流里面.视图名称解决方案是高可配置的(通过文件扩增名, Header中的Accept Content-type类型, Bean名称,属性文件,又或者是实现ViewResolver来指定),数据是个Map接口,允许完成视图技术的虚实现. 也可以直接与模板整合(JSP,Velocity,Freemarker等,或者直接生成XML,JSON,Atom,和其他类型的文本).数据模型Map会被简单的翻译成一个合适的格式,例如JSP中的request attributes, Velocity temllate model.
spring web模块支持的特性
- 清晰的角色划分,每一种角色- controller, validator, command object, form object, model object, DispatcherServlet, handler mapping, view resolver 等, 都可以被专门的对象所验证
- 强大且直接了当的配置(将框架可应用的类都作为JavaBean). 配置能力包括 通过上下文简单的引用,从Controller中应用业务对象和校验器
- 适应性,非入侵式,和灵活性.可定义任何一个所需要的Controller方法签名,在一些场景下可能需要用到一些参数注解(@RequestParam,@RequestHeader,@PathVariable等).
- 可复用的业务代码,无需重复.使用一个已经存在业务对象zowie一个命令或者表单对象 代替 为了扩展指定的框架基类而复制他们.
- 可定制的绑定与校验.将类型匹配失败作为应用级别的校验错误,并持有违规的值, 用来代替只用字符串接收表单对象并手工解析和转换为业务对象
- 可定制的处理映射和视图方案.
- 灵活的模型转换.模型转换使用简单的 name/value 的 map形式,从而可以简单的与任何视图技术整合.
- 可定制的区域,时区和主题方案.支持JSP, JSTL, Velocity
- 简单且强大的JSP标签库
- Bean 的生命周期的范围可以是 一次Http请求,或者是 Http Session 的范围.(WebApplicationContext中Bean的作用范围分为:Requst,session 和 global session scopes)
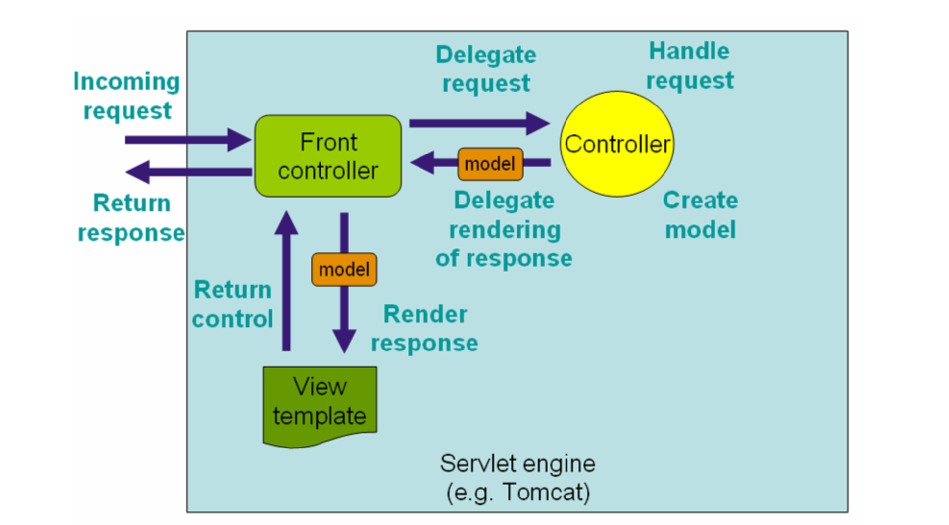
The DispatcherServlet
spring web framework和其他MVC框架一样, 请求驱动,围绕着一个中心Servlet来派发请求到controller 并且提供其他的一些利于开发的功能.同时也整合了Spring IOC容器,所以也包含spring的特性. 请求工作流如下图所示:
DispatcherServlet除了在web.xml中配置外,也可使用编程的方式使用
    public class MyWebApplicationInitializer implements WebApplicationInitializer {
      @Override
      public void onStartup(ServletContext container) {
          ServletRegistration.Dynamic registration = container.addServlet("dispatcher", new
          DispatcherServlet());
          registration.setLoadOnStartup(1);
          registration.addMapping("/example/\*");
      }
    }
在springMVC中每个DispatcherServlet都有它自己的WebApplicationContext,这个上下文会继承所有已经定义在根上下文WebApplicationContext中的Bean,这些继承可以在servlet指定的作用域中覆盖,也可以自己给Servlet引用定义一个新的本地作用域.
springMVC默认寻找 /WEB-INFO下的 [servlet-name]-servlet.xml文件,作为DispacherServlet的配置文件
根上下文的在web.xml中的配置(默认去获取上下文参数中contextConfigLocation所对应的值,作为根上下文的配置文件路径)
  <web-app>
    <context-param>
      <param-name>contextConfigLocation</param-name>
      <param-value>/WEB-INF/root-context.xml</param-value>
    </context-param>
    <listener>
      <listener-class>org.springframework.web.context.ContextLoaderListener</listener-class>
    </listener>
  </web-app>
可以使用 RequestContextUtils来获取 WebApplicationContext
Special Bean Types In the WebApplicationContext
DispatcherServlet使用指定的beans来处理请求和渲染合适的视图(如果不做任何配置则SpringMVC会有默认的bean来处理)
- HanderMapping 处理到来的请求映射关系 (最受欢迎的处理器是基于注解的处理器)
- HanderAdapter 帮助DIspatcherServlet执行请求映射处理,忽略真正的处 的注解.理器.例如:执行一个基于注解的Controller要去处理一系列注解,HanderAdapter的主要目的就是向DispatcherServlet屏蔽处理细节.
- HandlerExceptionResolver 映射异常处理视图,也可以加入复杂异常的处理代码
- ViewResolver 解决基于字符串的逻辑视图名字 到一个 真实的视图类型
- LocaleResolver & LocaleContextResolver 解决用户区域和时区问题,提供一个国际化的视图
- ThemeResolver 解决web应用使用的主题问题,例如提供个性化的布局
- MultipartResovler 解析分块的请求,比如支持处理文件上传
- FlashMapManager 存储和检索输入和输出,可以用来将一个参数从一个请求传递给另外一个.常用来处理重定向
Default DispatcherServlet Configuration
上面提到的DispacherServlet对每一种指定的bean都有一个默认的使用,这个默认配置在 包 org.springframework.web.servlet 下的 DispacherServlet.properties文件中
DispatcherServlet Processing Sequence
请求处理流程
- 搜索webApplicationContext并将其作为一个attribute放到Requst中供controller和其他元素使用.webApplicationContext默认绑定到Request中的key为 DispacherServlet.WEB_APPLICATION_CONTEXT_ATTRIBUTE.
- 绑定一个Locale Resovler到Request中
- 绑定一个theme Resovler到Request中
- 如果指定了分块文件处理器,请求会被检查是否为分块请求.如果是分块请求,则请求会被包裹进 MultipartHttpServletRequest中,以方便未来由其他元素来处理.
- 寻找一个合适的处理器,执行处理器的关系链(preprocessors,postprocessors以及controller),准备数据模型或渲染
- 如果返回了一个Model,则渲染视图.如果没有返回一个Model(可能是由于前置处理器或者后置处理器拦截了请求,或许是由于安全的原因),则不渲染视图,因为这个请求以及完成了.
异常处理器声明在WebApplicationContext中,如果在请求处理期间发生异常,则可以用这些异常处理器自定义异常对应的行为
spring DispatcherServlet也支持返回 last-modification-date, 由Servlet API指定.DispacherServlet会搜索合适的请求映射并且测试它是否实现了 LastModified 接口.如果实现了该接口,则使用接口的方法获取对应的时间,返回给客户端(该值可用于客户端实现缓存)
通过配置初始化参数,可以定制个人的DispacherServlet,下面罗列的是所有DispacherServlet的初始化参数
- contextClass 指定一个WebApplicationContext的子类,Servlet实例化上下文所用的类,默认使用XmlWebApplicationContext
- contextConfigLocation 指定上下文配置文件路径(通过逗号分割,支持多个配置文件)
- namespace WebApplicationContext的命名空间,默认是 [servlet-name]-servlet.
Implementing Controller
controller提供通过服务接口来访问应用行为.controller可以理解为 转换用户输出数据变成一个Model,以方便视图展现.spring实现一个controller的方式非常抽象,所以可以创建各种各样的controller
controller的实现无需继承任何指定基类或者实现指定接口,不会直接依赖Servlet或者Portlet 的APIs,因此可以轻松的在Servlet或者Portlet设备上使用
controller简单使用:
    @Controller
    public class HelloWorldController {
        @RequestMapping("/helloWorld")
        public String helloWorld(Model model) {
            model.addAttribute("message", "Hello World!");
            return "helloWorld";
        }
    }
使用@Controller来定义一个控制器
注解扫描配置:
    <?xml version="1.0" encoding="UTF-8"?>
    <beans xmlns="http://www.springframework.org/schema/beans"
      xmlns:xsi="http://www.w3.org/2001/XMLSchema-instance"
      xmlns:p="http://www.springframework.org/schema/p"
      xmlns:context="http://www.springframework.org/schema/context"
      xsi:schemaLocation="
        http://www.springframework.org/schema/beans
        http://www.springframework.org/schema/beans/spring-beans.xsd
        http://www.springframework.org/schema/context
        http://www.springframework.org/schema/context/spring-context.xsd">

      <context:component-scan base-package="org.springframework.samples.petclinic.web"/>
      <!-- ... -->

    </beans>
使用@RequestMapping来映射请求
常规用法:
    @RequestMapping(value="/{day}", method = RequestMethod.GET)
    public Map<String, Appointment> getForDay(@PathVariable @DateTimeFormat(iso=ISO.DATE) Date day,
    Model model) {
        return appointmentBook.getAppointmentsForDay(day);
    }
    @RequestMapping(value="/new", method = RequestMethod.GET)
    public AppointmentForm getNewForm() {
        return new AppointmentForm();
    }
    @RequestMapping(method = RequestMethod.POST)
    public String add(@Valid AppointmentForm appointment, BindingResult result) {
        if (result.hasErrors()) {
            return "appointments/new";
        }
        appointmentBook.addAppointment(appointment);
        return "redirect:/appointments";
    }
@Controller’s and AOP Proxying (这个鬼,不太清楚具体的问题,后续再看)
一些时候controller可能需要通过动态代理来修饰,如果使用了Spring Context非回调式的接口(InitializingBean,*Aware等),则需要指定class-based代理
New Support Classes for @RequestMapping methods in Spring MVC 3.1
spring 3.1 有一个新的支持 @RequestMapping 的类集合.分别是RequestMappingHandlerMapping 和 RequestMappingHandlerAdapter.它们被推荐在以后的版本使用.
在spring 3.1之前,类型和方法级别的请求映射是由两步来决定的,首先,由DefailtAnnotationHandlerMapping来选取一个controller,然后再由AnnotationMethodHandlerAdapter来选取真正执行的方法.
在spring 3.1的新支持中,RequestMappingHanderMapping会决定出请求应该被哪个方法执行.考虑把controller的方法作为一个唯一端点的集合,使用类型和方法级别的@RequstMapping信息映射每一个方法.
新的支持中,以下问题将_不再出现_(如果强行配置为老的类,则依然有以下问题):
- 先由SimpleUrlHandlerMapping 或者 BeanNameUrlHandlerMapping选择一个controller,然后再基于@RequstMapping选择方法,
- 依赖方法名称作为回调机制,导致两个@RequestMapping方法没有明确的路径映射,但是其他都匹配的情况下,产生歧义.新的支持类每个@RequstMapping方法都是唯一映射的
- 使用默认方法(没有一个明确的路径映射)用来处理其他controller没有匹配的情况,新的支持类,如果不匹配则返回404页面
URI Template Patterns
使用: 1.在方法上 @RequestMapping(value=”/owners/{ownerId}”, method=RequestMethod.GET) public String findOwner(@PathVariable String ownerId, Model model) { Owner owner = ownerService.findOwner(ownerId); model.addAttribute(“owner”, owner); return “displayOwner”; }
-
在Controller上
@Controller @RequestMapping("/owners/{ownerId}") public class RelativePathUriTemplateController { @RequestMapping("/pets/{petId}") public void findPet(@PathVariable String ownerId, @PathVariable String petId, Model model) { // implementation omitted } } -
正则表达式的使用 以下方法匹配的URL为 /spring-web/spring-web-3.0.5.jar
 @RequestMapping("/spring-web/{symbolicName:[a-z-]}-{version:\\d\\.\\d\\.\\d}{extension:\\.[a-z]}")
 public void handle(@PathVariable String version, @PathVariable String extension) {
     // ...
 }
正则表达式匹配问题: URL匹配多个正则时,则考虑使用更加具体的匹配
- 使用变量更少的匹配(/hotels/{hotel}/* 比 hotels/{hotel}/** 更加具体)
- 变量个数相等,使用匹配更长的url映射(foo/bar* 和 foo/*,使用前者)
- 变量个数和url长度都想等时,通配符越少越匹配.(/hotels/{hotel} 和 /hotels/* 使用前者) 正则匹配的特殊规则:
- 默认匹配串/**比任何其他的正则都更加不具体.例如/api/{a}/{b}/{c},则优先使用后者
- 类似于 /public/** 的正则匹配串 比 任何不包含双重通配符
都更加不具体,例如:/public/path3/{a}/{b}/{c},后者更加具体
匹配URL的所有详情在AntPathMatcher中的AntPatternComparator中(路径匹配是可自定义的).
Path Patterns with Placeholders
路径正则匹配,支持 ${…}的占位符. 详细信息在PropertyPlaceholderConfigurer中
Suffix Pattern Matching
后缀匹配. springMvc默认匹配 “.{asterisk}”后缀. Controller 中的URL /person 默认匹配 /person.{asterisk} 比如 /person.pdf 和 /person.xml
Matrix Variables
RFC 3986 中定义了在路径中包含 name-value 的键值对
使用: springMVC文件配置
<mvc:annotation-driven enable-matrix-variables="true"/>
1.
    // GET /pets/42;q=11;r=22
    @RequestMapping(value = "/pets/{petId}", method = RequestMethod.GET)
    public void findPet(@PathVariable String petId, @MatrixVariable int q) {
        // petId == 42
        // q == 11
    }
2.
    // GET /owners/42;q=11/pets/21;q=22
    @RequestMapping(value = "/owners/{ownerId}/pets/{petId}", method = RequestMethod.GET)
    public void findPet(
    @MatrixVariable(value="q", pathVar="ownerId") int q1,
    @MatrixVariable(value="q", pathVar="petId") int q2) {
        // q1 == 11
        // q2 == 22
    }
3.
    // GET /pets/42
    @RequestMapping(value = "/pets/{petId}", method = RequestMethod.GET)
    public void findPet(@MatrixVariable(required=false, defaultValue="1") int q) {
        //  q == 1
    }
4.
    // GET /owners/42;q=11;r=12/pets/21;q=22;s=23
    @RequestMapping(value = "/owners/{ownerId}/pets/{petId}", method = RequestMethod.GET)
    public void findPet(
    @MatrixVariable Map<String, String> matrixVars,
    @MatrixVariable(pathVar="petId"") Map<String, String> petMatrixVars) {
        // matrixVars: ["q" : [11,22], "r" : 12, "s" : 23]
        // petMatrixVars: ["q" : 11, "s" : 23]
    }
Consumable Media Types
可使用媒体类型来匹配请求,若请求媒体类型不在配置list中,则无法匹配请求
    @Controller
    @RequestMapping(value = "/pets", method = RequestMethod.POST, consumes="application/json")
    public void addPet(@RequestBody Pet pet, Model model) {
        // implementation omitted
    }
Producible Media Types
使用 请求头中的 Accept 匹配可接受的类型 来匹配 url
    @Controller
    @RequestMapping(value = "/pets/{petId}", method = RequestMethod.GET, produces="application/json")
    @ResponseBody
    public Pet getPet(@PathVariable String petId, Model model) {
        // implementation omitted
    }
Request Parameters and Header Values
使用请求的参数进行url匹配
    @Controller
    @RequestMapping("/owners/{ownerId}")
    public class RelativePathUriTemplateController {
        @RequestMapping(value = "/pets/{petId}", method = RequestMethod.GET, params="myParam=myValue")
        public void findPet(@PathVariable String ownerId, @PathVariable String petId, Model model) {
            // implementation omitted
        }
    }
使用请求头中信息匹配url
    @Controller
    @RequestMapping("/owners/{ownerId}")
    public class RelativePathUriTemplateController {
        @RequestMapping(value = "/pets", method = RequestMethod.GET, headers="myHeader=myValue")
        public void findPet(@PathVariable String ownerId, @PathVariable String petId, Model model) {
            // implementation omitted
        }
    }
Defining @RequestMapping handler methods (p454)
定义一个 @RequstMapping的方法签名是非常灵活的,除了 BindingResult 参数,其他大部分参数都可以随意排序.
@ReqiestMapping方法支持的参数
- Request 和 response 对象 (Servlet API), 可选择任意指定的 request 或 response 类型,如 ServletRequest 或 HttpServletRequest
- Session 对象 (Servlet API) , 类型是 HttpSession, Session对象的访问并不是线程安全的,多线程并发访问Session, 可以考虑将
RequestMappingHandlerAdapter的synchronizeOnSession配置为 true - org.springframework.web.context.request.WebRequest 和 org.springframework.web.context.request.NativeWebRequest 对象. 通用的访问请求参数(request/session). 而不用绑定 servlet/portlet API
- java.util.Locale 对象说明, 由可用的 区域处理器 决定. MVC中的 LocaleResolver/LocaleContextResolver配置
- java.util.TimeZone (Java 6+) / java.time.ZoneId (on Java 8) , 由 LocaleContextResolver 决定
- java.io.InputStream / java.io.Reader , 用来访问请求内容(request’s content), InputStream/Reader 值由Servlet API 来暴露
- java.io.OutputStream / java.io.Writer , 用来访问返回内容(response’s context), OutputStream/Writer 由Servlet API来暴露
- org.springframework.http.HttpMethod , 请求方法枚举(GET, POST, HEAD, OPTIONS, PUT, PATCH, DELETE, TRACE)
- java.security.Principal 包含当前验证用户
- 相关注解
@PathVariable,@MatrixVariable,@RequestParam,@RequestHeader,@RequestBody,@RequestPart,HttpEntity<?>(使用HttpMessageConverter进行参数转换) - java.util.Map/org.springframework.ui.Model/org.springframework.ui.ModelMap, 丰富暴露给页面展示的数据
- org.springframework.web.servlet.mvc.support.RedirectAttributes , 指定重定向的属性集合(重定向带过去的参数信息), 返回视图包含”redirect:”或者RedirectView时,可用. 参数集合同时也会被放到 flash attribute 中flash attribute说明
- 命令或者表单对象使用可定制的转换绑定bean属性, 依赖
@InitBinder方法 和 HandlerAdapter配置 (请看RequestMappingHandlerAdapter中的webBingdingInitializer属性).ModelAttribute注解.可以用在方法参数上去定制属性名称. (ModelAttribute注解的使用) - org.springframework.validation.Errors/org.springframework.validation.BindingResult, 绑定属性的验证结果, 每个绑定属性的结果对象必须放在,model对象的下一个参数声明.
public String processSubmit(@ModelAttribute("pet") Pet pet, Model model, BindingResult result)与public String processSubmit(@ModelAttribute("pet") Pet pet, BindingResult result, Model model). 则前面一种声明,不会生效 - org.springframework.web.bind.support.SessionStatus. 与
@SessionAttributes注解相关. (获取SessionStatus后,可调用setComplete方法,标记session处理已完成,此时会触发Session的清理操作,清理掉@SessionAttributes存放的属性) - org.springframework.web.util.UriComponentsBuilder. 当前请求的host, port, scheme, context path等信息
支持的方法返回类型:
- ModelAndView, Model中会包含通过
@ModelAttribute放入的属性 - Model, Model中会包含通过
@ModelAttribute放入的属性, 视图名称通过RequestToViewNameTranslator获取 - Map, 通过一个map来暴露一个model,其中也会包含通过
@ModelAttribute放入的属性 - View, 视图的Model中包含通过
@ModelAttribute放入的属性, 也可通过声明一个Model方法参数来丰富Model - String, 表示一个逻辑视图的名称. 视图的Model中包含通过
@ModelAttribute放入的属性, 也可通过声明一个Model方法参数来丰富Model - void, 则可通过声明ServletResponse/HttpServletResponse参数来自己写入返回信息.或者通过
RequestToViewTranslator来执行视图名称(此种情况在处理方法的签名中不可什么response参数) - 如果方法被
@ResponseBody注解标注.则它的返回值会被写入 Http的返回体中.返回值转换由HttpMessageConverters来中操作 - HttpEntity 或者 ResonseEntity (待查看如何使用?)
- Callable<?> 如果想要异步处理请求,则可返回Callable实现
- DefferredResult<?> 应用想要通过自己选择的线程获取返回值(什么鬼?)
- ListenableFuture<?> 应用想要通过自己选择的线程获取返回值(这又什么鬼?)
- 其他任何类型的返回值都被当作一个单独的Model中的属性暴露给视图.(可通过
@ModelAttribute指定该属性的名称,或者使用返回类型的类名作为默认属性名称)
使用说明:
- 1..
@RequestParam如果被用在 Map<String, String> 或者 MultiValueMap<String, String>参数上,则map中会包含所有的请求参数 - 2..
@RequestBody会将http请求体的中数据全部放入参数中.public void handle(@RequestBody String body, Writer writer), 也可使用 HttpMessaeConverter 转换成支持的类型 -
3.. 可通过类似如下的方式增加类型转换器:
    <bean class="org.springframework.web.servlet.mvc.method.annotation.RequestMappingHandlerAdapter">
        <property name="messageConverters">
          <util:list id="beanList">
            <ref bean="stringHttpMessageConverter"/>
            <ref bean="marshallingHttpMessageConverter"/>
          </util:list>
        </property
        </bean>
    <bean id="stringHttpMessageConverter" class="org.springframework.http.converter.StringHttpMessageConverter"/>
    <bean id="marshallingHttpMessageConverter"
        class="org.springframework.http.conerter.xml.MarshallingHttpMessageConverter">
          <property name="marshaller" ref="castorMarshaller" />
          <property name="unmarshaller" ref="castorMarshaller" />
    </bean>
    <bean id="castorMarshaller" class="org.springframework.oxm.castor.CastorMarshaller"/>
如果controller中的方法声明中没有声明类型转换错误的参数(Error)时,则会抛出MethodArgumentNotValidException异常,并向客户端返回400状态码
-
4.. 使用
@RestController则相当于将contrller中的所有请求处理方法上加上@ResponseBody注解, 它是@ResponseBody和@Controller的一种组合形式, 可以@ControllerAdvice一起使用(这个注解干嘛的?) -
5.. HttpEntity的使用, 与
@RequestBodyand@ResponseBody类似, 可获取请求头中的信息@RequestMapping("/something") public ResponseEntity<String> handle(HttpEntity<byte[]> requestEntity) throws UnsupportedEncodingException { String requestHeader = requestEntity.getHeaders().getFirst("MyRequestHeader")); byte[] requestBody = requestEntity.getBody(); // do something with request header and body HttpHeaders responseHeaders = new HttpHeaders(); responseHeaders.set("MyResponseHeader", "MyValue"); return new ResponseEntity<String>("Hello World", responseHeaders, HttpStatus.CREATED); } -
6..
@ModelAttribute像下面一样用在方法参数上,则表明, 参数会优先在 Model中查找,如果找到,则使用该值(也可能是使用@SessionAttribute添加的对象), 如果没有找到,则实例化该对象,并用请求中的参数填充对象.@RequestMapping(value="/owners/{ownerId}/pets/{petId}/edit", method = RequestMethod.POST) public String processSubmit(@ModelAttribute Pet pet) { }下面的情况.则需要注册一个
Converter<String,Account>转换器.@RequestMapping(value="/accounts/{account}", method = RequestMethod.PUT) public String save(@ModelAttribute("account") Account account) { } -
7.. 以下使用,表明 将 controler的Modle中的 Pet 属性放入 Session中
@Controller @RequestMapping("/editPet.do") @SessionAttributes("pet") public class EditPetForm { // ... } -
8.. 使用
@CookieValue获取cookie中的信息@RequestMapping("/displayHeaderInfo.do") public void displayHeaderInfo(@CookieValue("JSESSIONID") String cookie) { //... } -
9.. 使用
@InitalBean定制参数类型转换@Controller public class MyFormController { @InitBinder public void initBinder(WebDataBinder binder) { SimpleDateFormat dateFormat = new SimpleDateFormat("yyyy-MM-dd"); dateFormat.setLenient(false); binder.registerCustomEditor(Date.class, new CustomDateEditor(dateFormat, false)); } // ... } -
10.. 页面 最后修改时间 last-modification 的使用, 在第二步中,如果方法返回为true,则会将response的状态码设置为304
@RequestMapping public String myHandleMethod(WebRequest webRequest, Model model) { long lastModified = // 1. application-specific calculation if (request.checkNotModified(lastModified)) { // 2. shortcut exit - no further processing necessary return null; } // 3. or otherwise further request processing, actually preparing content model.addAttribute(...); return "myViewName"; } -
11..
@ControllerAdvice标注的类中,常常用来包含 @ExceptionHandler, @InitBinder, @ModelAttribute 等注解方法,在所有满足条件的@RequestMapping调用的时候使用.// Target all Controllers annotated with @RestController @ControllerAdvice(annotations = RestController.class) public class AnnotationAdvice {} // Target all Controllers within specific packages @ControllerAdvice("org.example.controllers") public class BasePackageAdvice {} // Target all Controllers assignable to specific classes @ControllerAdvice(assignableTypes = {ControllerInterface.class, AbstractController.class}) public class AssignableTypesAdvice {} -
12.. Jackson序列化支持,使用Jackson序列化的方式: 1.
@ResponseBody2. 返回ResponseEntity, 3.@JsonView
@JsonView的简单使用
      @RestController
      public class UserController {
          @RequestMapping(value = "/user", method = RequestMethod.GET)
          @JsonView(User.WithoutPasswordView.class)
          public User getUser() {
              return new User("eric", "7!jd#h23");
          }
      }

      public class User {
          public interface WithoutPasswordView {};
          public interface WithPasswordView extends WithoutPasswordView {};
          private String username;
          private String password;

          public User() {
          }

          public User(String username, String password) {
            this.username = username;
            this.password = password;
          }

          @JsonView(WithoutPasswordView.class)
          public String getUsername() {
              return this.username;
          }

          @JsonView(WithPasswordView.class)
          public String getPassword() {
              return this.password;
          }
      }
-
13.. SpringMVC对JSONP的支持, 在使用了 @ResponseBody 和 ResponseEntity 的方法时.可按如下方式实现JSONP
  @ControllerAdvice
  public class JsonpAdvice extends AbstractJsonpResponseBodyAdvice {
      public JsonpAdvice() {
          super("callback");
      }
  }
Asynchronous Request Processing ( 异步请求处理 )
关于使用异步应答的动机,以及在什么时候,为什么要使用异步应答的解答:传送门, 异步应答的两种方式
-
1.. 返回 Callable<?>
@RequestMapping(method=RequestMethod.POST) public Callable<String> processUpload(final MultipartFile file) { return new Callable<String>() { public String call() throws Exception { // ... return "someView"; } }; } -
2.. 返回 DeferredResult<?>
    @RequestMapping("/quotes")
    @ResponseBody
    public DeferredResult<String> quotes() {
        DeferredResult<String> deferredResult = new DeferredResult<String>();
        // Save the deferredResult in in-memory queue ...
        return deferredResult;
    }

    // In some other thread...
    deferredResult.setResult(data);
两种方式最主要的差别是,执行异步处理的线程是由谁控制, 第一种情况,由SpringMVC控制,第二种请求,有应用自己来控制
第一种返回Callable<?>的处理流程(2,3,4的执行顺序依赖各个线程的执行速度):
- controller返回Callable
- springMVC开启一个异步处理提交Callable到TaskExcutor中,在另外一个线程中处理
- DispatcherServlet 和 所有的 filter 都退出这个请求处理的线程,但是保存输出流为打开状态
- Callable处理完成,产生一个结果,springMVC分派这个请求回Servlet容器中.
- DispacherServlet使用Callable产生的结果,再次执行和恢复处理
第二种返回 DeferredResult 的处理流程(2,3,4的执行顺序依赖各个线程的执行速度) :
- controller返回DeferredResult, 并且将它放到某个内存队列中
- springMVC开启异步处理
- DispatcherServlet 和 所有的 filter 都退出这个请求处理的线程,但是保存输出流为打开状态
- 应用线程,设置DeferredResult的结果,SpringMVC重新分派这个请求进Servlet容器
- DispacherServlet使用DeferredResult中的结果,再次执行和恢复处理
异步应答的异常处理
异步应答的异常处理同普通的同步应答异常处理一样,由@ExceptionHandler标记的方法 或者 HandlerExceptionResolver 处理.
如果使用 DeferredResult的方式,则 可以自行调用setErrorResult(Object)设置错误结果,或者与前面的处理一样
Intercepting Async Requests 异步请求的拦截器
可通过实现 AsyncHandlerInterceptor 接口来处理
或者实现 CallableProcessingInterceptor 或者 DeferredResultProcessingInterceptor 接口来实现拦截
使用异步请求处理时,web.xml的配置
      <web-app xmlns="http://java.sun.com/xml/ns/javaee"
      xmlns:xsi="http://www.w3.org/2001/XMLSchema-instance"
      http://java.sun.com/xml/ns/javaee
      http://java.sun.com/xml/ns/javaee/web-app_3_0.xsd"
      version="3.0">
            ...
      </web-app>
DispatcherServlet 和 所有的 filter 都需要配置:
<async-supported>true</async-supported>
完整配置 例子:
    <web-app xmlns="http://java.sun.com/xml/ns/javaee"
          xmlns:xsi="http://www.w3.org/2001/XMLSchema-instance"
          xsi:schemaLocation="
          http://java.sun.com/xml/ns/javaee
          http://java.sun.com/xml/ns/javaee/web-app_3_0.xsd"
          version="3.0">
          <filter>
              <filter-name>Spring OpenEntityManagerInViewFilter</filter-name>
              <filter-class>org.springframework.~.OpenEntityManagerInViewFilter</filter-class>
              <async-supported>true</async-supported>
          </filter>

          <filter-mapping>
              <filter-name>Spring OpenEntityManagerInViewFilter</filter-name>
              <url-pattern>/\*</url-pattern>
              <dispatcher>REQUEST</dispatcher>
              <dispatcher>ASYNC</dispatcher>
          </filter-mapping>
    </web-app>
关于springMVC的测试
Hander Mapping 映射处理
在之前版本的spring中,用户需要定义多个HandlerMapping的bean来映射请求到对应的处理器.而使用注解Controller的话,就基本不用那样做了,因为RequestMappingHanderMapping 会自动的查找所有@Controller控制器中的@RequestMapping映射.但是,请记得所有的HandlerMapping类都继承自AbstractHandlerMapping,有以下属性可供用户自定义行为:
interceptors拦截器.defaultHandler在没有匹配的处理器时使用的处理器alwaysUseFullPath默认是false,表示使用使用全路径来配置合适的处理器. 如果Servlet映射配置为/testing/*,请求 /testing/viewPage.html请求到来的情况下, 在默认false时, /viewPage.html 可匹配上处理器.如果 alwaysUseFullPath 为 true, 则会匹配 /testing/viewPage.html 的处理器urlDecode默认是true. 即默认使用解密的url路径做匹配.HttpServletRequest总是会在Servelet中暴露解密的路径.所以,需要注意不要使用 Servlet 的路径 去匹配加密的路径了
拦截器简单配置:
    <beans>
        <bean id="handlerMapping" class="org.springframework.web.servlet.mvc.method.annotation.RequestMappingHandlerMapping">
            <property name="interceptors">
                <list>
                      <ref bean="officeHoursInterceptor"/>
                </list>
            </property>
        </bean>
    <beans>
Intercepting requests with a HandlerInterceptor 通过 HandlerInterceptor 实现请求拦截
spring的请求映射机制包含处理拦截,在需要实现一些指定功能是非常有用. 使用拦截器需要实现在org.springframework.web.servlet包下面的HandlerInterceptor接口.接口包含三个方法,风别是preHandle(..)(在真正的请求处理器处理前执行,如果返回true,则继续执行后续的拦截器.如果返回false,不会继续执行后续动作,且DispatcherServlet认为拦截器以及处理好了请求,比如渲染了一个合适的视图),postHandle(..)(在真正的请求处理器处理后执行)和afterCompletion(..)(在请求完成后执行).这三个方法足够灵活的可以去定义前置处理和后置处理了
继承 HandlerInterceptorAdapter 可以更加方便的实现一个 HandlerInterceptor接口
在使用了 @ResponseBody 和 ResponseEntity 方法上并不一直适用 HandlerInterceptor的postHandle方法,因为在这种情况下 HttpMessaegeConverter在 postHandle方法执行之前会将数据写入response中,并提交.导致不可能在改变response.可以通过实现 ResponseBodyAdVice 或者 声明 @ControllerAdvice 类 又或者直接在RequestMappingHandlerAdapter中配置来解决这个问题.
Resolving Views
spring支持的视图解决器,允许你在没有尝试指定视图技术的情况下渲染数据.在第18章讨论了各种不同的视图技术怎么和spring整合在一起.在spring处理视图中ViewResolver和View两个接口是非常重要的.ViewResovler支持在视图名称和真实视图之间的映射.View接口为请求准备一个视图技术
Resolving views with the ViewResolver interface
在前面介绍的controller实现章节中,所有的请求处理器都要决定一个逻辑视图名称.通过显式(返回String,View等)或者隐式(根据约定),下面是spring提供的视图解决器的列表:
- AbstractCachingViewResovler 提供在使用前需要提前准备的处理器.提供处理器缓存
- XmlViewResolver 接收一个配置文件,使用DTD文件作为XML文件的工厂写入XML中.默认配置在 /WEB-INF/views.xml
- ResourceBundleVIewResovler 在一个
ResourceBundle中使用,通过一个基本的名字指定.通常情况.需要定一个绑定关系的配置文件.放在类路径下.默认文件名为views.properties(什么鬼?) - UrlBasedViewResovler 使用url名称作为逻辑视图名字.不用使用显式的映射定义.在不需要随意的映射时,即逻辑视图名称和视图以直接的方式关联时,比较适用.
- InternalResourceViewResolver
UrlBasedViewResovler的子类.为了更加方便的支持InternalResourceView,可以为所有的视图指定视图类.(什么鬼?) - VelocityViewResovler/FreeMarkerViewResovler
UrlBasedViewResovler的子类 为了更加方便的支持VelocityView或者FreMarkerView ContentNegotiatingVIewResovler通过一个请求的文件名或者Accept请求头来解决视图映射.在ContentNegotiatingVIewResovler章节中详解.
下面是一个使用了JSP技术的,且使用url请求映射视图的配置
    <bean id="viewResolver" class="org.springframework.web.servlet.view.UrlBasedViewResolver">
            <property name="viewClass" value="org.springframework.web.servlet.view.JstlView"/>
            <property name="prefix" value="/WEB-INF/jsp/"/>
            <property name="suffix" value=".jsp"/>
    </bean>
当返回 “test”作为视图名称的时候,则请求的视图会请求到 /WEB-INF/jsp/test.jsp
如果在应用中使用了不同的视图技术.则可以使用ResourceBundleViewResovler, ResourceBundleViewResolver对于每个要处理的视图,都会检查 ResourceBundle中basename的唯一性,它使用 [viewname].(class)作为视图类,[viewname].url作为视图的url(一脸蒙B)
    <bean id="viewResolver"     class="org.springframework.web.servlet.view.ResourceBundleViewResolver">
        <property name="basename" value="views"/>
        <property name="defaultParentView" value="parentView"/>
    </bean>
Chaining ViewResolvers (链式视图解析器 )
spring支持多种视图解决方案.如果配置了多个视图解析器,则可以配置order属性对解析器排序,order值越高,解析器执行越靠后,在下面的例子中,如果没有可使用的视图,则会抛出ServletException
    <bean id="jspViewResolver" class="org.springframework.web.servlet.view.InternalResourceViewResolver">
        <property name="viewClass" value="org.springframework.web.servlet.view.JstlView"/>
        <property name="prefix" value="/WEB-INF/jsp/"/>
        <property name="suffix" value=".jsp"/>
    </bean>
    <bean id="excelViewResolver" class="org.springframework.web.servlet.view.XmlViewResolver">
        <property name="order" value="1"/>
        <property name="location" value="/WEB-INF/views.xml"/>
    </bean>

    <!-- in views.xml -->
    <beans>
        <bean name="report" class="org.springframework.example.ReportExcelView"/>
    </beans>
视图解析器规定如果没有找到视图就返回null。但不是所有的视图解析器都这么做,因为在某些情况下,解析器并不能检测是否存在视图。比如InternalResourceViewResolver在内部使用RequestDispatcher时,调度转发是判断JSP是否存在的唯一方法,但该action却只能执行一次。VelocityViewResolver和其它的一些解析器也这样,区分这些视图解析器能否在找不到视图的情况下返回null,最好的方法就是看官方文档中它是否支持。由于 InternalResourceViewResolver总会返回视图,在视图链中使用InternalResourceViewResolver就能让你避免这些问题。
请求重定向
请求重定向后,默认情况下,所有的模板属性变量都认为是重定向URL,其余的属性自动附加为查询参数
    @RequestMapping(value = "/files/{path}", method = RequestMethod.POST)
    public String upload(...) {
        // ...
        return "redirect:files/{path}";
    }
也可使用 forward:前缀.
ContentNegotiatingViewResolver
如果有两个url分别为http://www.example.com/users/fred.pdf和http://www.example.com/users/fred.xml, 当请求 http://www.example.com/users/fred到来时,可在accept中设置application/pdf来指向pdf的那个handler.
使用举例:
若accept请求头中设置为 Accept: text/html,application/xhtml+xml,application/xml;q=0.9,*/*;q=0.8, 则可像如下方式设置.
    <bean class="org.springframework.web.servlet.view.ContentNegotiatingViewResolver">
        <property name="mediaTypes">
          <map>
            <entry key="atom" value="application/atom+xml"/>
            <entry key="html" value="text/html"/>
            <entry key="json" value="application/json"/>
          </map>
        </property>

        <property name="viewResolvers">
          <list>
            <bean class="org.springframework.web.servlet.view.BeanNameViewResolver"/>
            <bean class="org.springframework.web.servlet.view.InternalResourceViewResolver">
                <property name="prefix" value="/WEB-INF/jsp/"/>
                <property name="suffix" value=".jsp"/>
            </bean>
          </list>
        </property>

        <property name="defaultViews">
          <list>
            <bean class="org.springframework.web.servlet.view.json.MappingJackson2JsonView"/>
          </list>
        </property>
    </bean>

    <bean id="content" class="com.foo.samples.rest.SampleContentAtomView"/>
Using flash attributes
flash attributes 支持在一个请求中保存属性在另一个请求中使用.最常用的情况是在重定向的时候使用,例如post/Redirect/Get模板.flash attributes 可以在重定向可用前临时保存属性,会在重定向完成后,立即移除属性.
spring mvc对flash attributes的支持有两个主要的抽象.FlashMap用来持有属性.FlashMapManager用来存储,取回,和管理FlashMap引用
Flash attribute只是是默认打开的.不需要明确的开启.它不会导致http会话创建.每一个请求都有一个输入的FlashMap从另一个请求中获取属性 , 同时也有一个输出的FlashMap用来保存属性.两个FlashMap引用可以在springMVC中的任何地方通过RequestContextUtil使用.
使用注解的controller不用直接使用FlashMap,被@RequstMapping注解的方法,可以接收一个类型为RediretAttributes的参数,在重定向的场景中可以使用它来增加flash attributes. Flash attributes 会在RedirectAttributes中自动传播到输出FlashMap中.类似的.FlashMap中的属性会和Model中的属性一样增加进controller重定向的目标url请求中
Matching requests to flash attributes
flash attributes的概念在大多是的web框架中都有,并且它被证实是有并发问题的.这是因为flash attributes的定义是存储属性,直到下一个请求的到来.但是这个”下一个”请求还未获取属性时,可能有另一个异步的请求造成这个case中的flash attributes被提前移除了.
为了减少这个问题出现的可能性.RedirectView 自动使用重定向目标url的请求参数给FlashMap引用添加标签,在查找”input”FlashMap的时候,默认使用这些标签去匹配.
这样做当不会完全消除并发的问题.但是已经大量减少了出现问题的可能性,因此在重定向的情景下是比较推荐使用flash attributes的.
URL构建
springMVC提供对url构建和编码的支持,UriComponentsBuilder 和 UriComponents,简单使用例子:
    UriComponents uriComponents = UriComponentsBuilder.fromUriString(
    "http://example.com/hotels/{hotel}/bookings/{booking}").build();
    URI uri = uriComponents.expand("42", "21").encode().toUri();

            UriComponents uriComponents = UriComponentsBuilder.newInstance()
                .scheme("http").host("example.com").path("/hotels/{hotel}/bookings/{booking}").build()
                .expand("42", "21")
                .encode();
servlet环境中使用 ServletUriComponentsBuilder:
    HttpServletRequest request = ...

    // Re-use host, scheme, port, path and query string
    // Replace the "accountId" query param

    ServletUriComponentsBuilder ucb = ServletUriComponentsBuilder.fromRequest(request)
        .replaceQueryParam("accountId", "{id}").build()
        .expand("123")
        .encode();


    // Re-use host, port and context path
    // Append "/accounts" to the path
    ServletUriComponentsBuilder ucb = ServletUriComponentsBuilder.fromContextPath(request)
        .path("/accounts").build()

    // Re-use host, port, context path
    // Append the literal part of the servlet mapping to the path
    // Append "/accounts" to the path
    ServletUriComponentsBuilder ucb = ServletUriComponentsBuilder.fromServletMapping(request)
        .path("/accounts").build()
构建url到controller和方法上:
假如有个controller如下:
    @Controller
    @RequestMapping("/hotels/{hotel}")
    public class BookingController {
        @RequestMapping("/bookings/{booking}")
        public String getBooking(@PathVariable Long booking) {
          // ...
        }
    }
则可使用MvcUriComponentsBuilder来映射到上面的url:
    UriComponents uriComponents = MvcUriComponentsBuilder
        .fromMethodCall(on(BookingController.class).getBooking(21)).buildAndExpand(42);
    URI uri = uriComponents.encode().toUri();
使用MvcUriComponentsBuilder也可以使用一个mock的controller.
    UriComponents uriComponents = MvcUriComponentsBuilder
        .fromMethodCall(on(BookingController.class).getBooking(21)).buildAndExpand(42);
    URI uri = uriComponents.encode().toUri();
在视图中构建url,JSP中使用的例子如下:
若有如下controller:
    @RequestMapping("/people/{id}/addresses")
    public class PersonAddressController {
        @RequestMapping("/{country}")
        public HttpEntity getAddress(@PathVariable String country) { ... }
    }
则在JSP中构建url:
    <%@ taglib uri="http://www.springframework.org/tags" prefix="s" %>
    ...
    <a href="${s:mvcUrl('PAC#getAddress').arg(0,'US').buildAndExpand('123')}">Get Address</a>
Using Locales
spring的大多数体系和springMVC一样都支持国际化, DispatcherServlet可以自动使用客户端区域LocaleResolver解决.当一个请求到来时,DispatcherServlet会寻找区域解决器.如果找到了,就会尝试使用.用RequstContext.getLocale()方法可以得到区域处理器.
除了使用自动的区域解决方案.在一些指定场景下也可是使用拦截器去处理区域映射.例如,基于请求中的参数选择区域处理器.
区域处理器和拦截器都定义在org.springframework.web.servlet.i18n包下面.
Obtaining Time Zone Information
除了获取用户端的区域.经常也需要知道它们的时区(time zone).LocaleContextResolver接口提供LocaleResolver的扩增,允许处理器提供一个更加丰富的LocaleContext.其中包含时区信息.
在可用的时候,客户端的TimeZone可以通过RequstContext.getTimeZone()方法获取.时区信息会自动使用注册到ConversionService中的Date/Time转换器(Converter)和格式化(ForMatter)对象.
AcceptHeaderLocaleResovler
这个区域处理器会检查客户端发送的消息中的请求头中的accept-language(例如通过浏览器发送).这个请求头属性中常常包含客户端操作系统的区域.但是注意_这个处理器不支持时区(time zone)信息_
CookieLocaleResolver
这个区域处理器会检查Cookie中是否指定了Locale或者TimeZone,若指定,则使用.也可以指定Cookie的名字和cookie有效期,例子如下:
    <bean id="localeResolver" class="org.springframework.web.servlet.i18n.CookieLocaleResolver">
          <property name="cookieName" value="clientlanguage"/>

          <!-- in seconds. If set to -1, the cookie is not persisted (deleted when browser shuts down) -->
          <property name="cookieMaxAge" value="100000">
    </bean>
CookieLocaleResolver中的属性
- cookieName cookie的名称.默认值为 classname+LOCALE
- cookieMaxAge cookie在客户端存货的时间,默认是
Integer.MAX_INT,若指定为-1,则cookie不会持久化.仅仅在客户端关闭浏览器之前有效 - cookiePatch 限制网站中某些部分方位这个cookie.当cookiePatch指定后.这个cookie只允许被满足配置的路径访问.默认值为 / .
SessionLocaleResovler
允许你从session中获取Locale和TimeZone,可能是关联了用户请求的.
LocaleChangeInterceptor
可以通过LocaleChangeInterceptor开启时区变动.它会检查请求中的参数,然后改变区域.下面的例子展示的是所有*.view的请求都包含一个siteLanguage的参数.用来改变时区.例如方位url:http://www.sf.net/home.view?siteLanguage=nl, 会改变站点的语音为荷兰(Dutch).
    <bean id="localeChangeInterceptor" class="org.springframework.web.servlet.i18n.LocaleChangeInterceptor">
          <property name="paramName" value="siteLanguage"/>
    </bean>

    <bean id="localeResolver" class="org.springframework.web.servlet.i18n.CookieLocaleResolver"/>

    <bean id="urlMapping" class="org.springframework.web.servlet.handler.SimpleUrlHandlerMapping">
        <property name="interceptors">
          <list>
            <ref bean="localeChangeInterceptor"/>
            </list>
        </property>
        <property name="mappings">
        <value>/\*\*/\*.view=someController</value>
        </property>
    </bean>
Using themes
可以通过使用springMVC框架的主题来设置应用的总体的外观和感受.从而提高用户体验.一个主题是一个静态资源的集合,一般是样式表和图片,影响应用的视觉风格.
Defining themes
在应用中若要使用主题,则需要设置一个org.springframework.ui.context.ThemeSource接口的实现.WebApplicationContext接口继承了ThemeSource接口,但是这个责任代理给了一个专门的实现.默认的代理是org.springframework.ui.context.support.ResourceBu ndleThemeSource实现,它会从类路径的根下面加载属性文件.如果要使用定制的ThemeSource实现或者配置基于名称前缀的ResourceBu ndleThemeSource,可以在应用上下文中注册一个叫themeSource的bean.web应用或自动使用这个bean.
在使用ResourceBundleThemeSource时,主题被定义在一个简单的属性文件.里面的属性列表用来构建主题.例如:
    styleSheet=/themes/cool/style.css
    background=/themes/cool/img/coolBg.jpg
上面的配置文件中的属性的key的名字是视图代码中的元素引用.如果是JSP,可以使用spring:theme定制标签 ,下面的例子使用上面的配置进行简单引用.感受一下:
    <%@ taglib prefix="spring" uri="http://www.springframework.org/tags"%>
    <html>
        <head>
            <link rel="stylesheet" href="<spring:theme code='styleSheet'/>" type="text/css"/>
        </head>
        <body style="background=<spring:theme code='background'/>">
            ...
        </body>
    </html>
默认情况下,ResourceBundleThemeSource使用空的名称前缀,这样的结果就是,配置文件是从类路径的根下面进行加载的,所以默认情况下需要将配置文件放在/WEB-INF/classes下面.ResourceBundleThemeSource使用标准的java资源文件加载机制,允许主题充分国际化.例如,我们可以创建/WEB-INF/classes/cool_nl.properties文件,引用一个指定的使用荷兰文字的背景.
Theme resolvers
在上一节,定义主题好之后,就可以决定使用哪个主题了.DispatcherServlet会查找一个叫themeResolver的ThemeResource的实现的bean.主题解析器工作方式和LocaleResovler一样.它为一个特定的请求,查找一个主题来使用,也可以改变请求的主题.Spring提供下面一些主题解析器:
FixedThemeResolver混合主题,使用defaultThemeName属性SessionThemeResolver这个主题保存在用户http的会话中.每一个session中只需要设置一次.但是无法在两个会话之前持续.CookieThemeResolver这个处理器将主题保存在客户端的cookie中
Spring支持用ThemeChangeInterceptor和请求中的简单参数为每个请求改变主题
Spring’s multipart (file upload) support
spring内置多模块支持在web应用中处理文件上传.可使用插件式MultipartResovler(定义在org.springframework.web.multipart包中)对象开启多模块支持. spring提供了一个MultipartResovler的实现,内部使用Commons FileUpload.还有一个是使用servlet3.0的多模块请求解析.
默认情况下.spring不会处理多模块.因为一些开发人员想要自己处理多模块请求.通过正佳一个多模块解析器到web上下文中,从而开启spring的多模块支持.每个请求都会检查它是否包含多模块.如果不是多模块的,则按照正常的请求继续处理.如果是多部分请求,则会使用声明在上下文中的MultipartResolver的实现.处理之后,多部分属性在请求中可以像任何其他属性一样对待.
Using a MultipartResolver with Commons FileUpload
下面是一个使用CommonsMultipartResovler的例子:
    <bean id="multipartResolver" class="org.springframework.web.multipart.commons.CommonsMultipartResolver">
        <!-- one of the properties available; the maximum file size in bytes -->
        <property name="maxUploadSize" value="100000"/>
    </bean>
为了使用这个需要引入commons-fileupload.jar包才能正常工作.
当DispatcherServlet碰到一个多部分的请求时,它会激活那个声明在上下文中的解析器去处理这个请求.解析器会包装当前的HttpServletRequest到MultipartHttpServletRequest中,以支持文件上传.在controller中使用MultipartHttpServletRequst,可以获取关于这个请求的多模块信息,以及可获得多部分文件本身的访问.
Using a MultipartResolver with Servlet 3.0
使用spring3.0的多模块解析需要在web.xml中设置DispatcherServlet的multipart-config.或者是使用javax.servlet.MultipartConfigElement的编程式Servlet注册.又或者是在自定义的Servlet类上使用javax.servlet.annotation.MultipartConfig注解.设置最大文件大小或者存储位置等配置需要依赖Servlet注册水平.Servlet3.0不允许在MultipartResovler中进行配置.
一旦通过上面提到的方式开启了Servlet3.0的多块解析,可以在spring的配置中增加StandardServletMultipartResolver.
    <bean id="multipartResolver"
        class="org.springframework.web.multipart.support.StandardServletMultipartResolver">
    </bean>
Handling a file upload in a form
MultipartResovler完成了处理,这个请求就可以像其他的请求一样被处理.首先,创建一个允许上传的表单.指定的编码属性(enctype=”multipart/form-data”)让浏览器知道如何将请求作为多部分请求进行编码.
    <html>
      <head>
        <title>Upload a file please</title>
      </head>
      <body>
        <h1>Please upload a file</h1>
        <form method="post" action="/form" enctype="multipart/form-data">
        <input type="text" name="name"/>
        <input type="file" name="file"/>
        <input type="submit"/>
      </form>
      </body>
    </html>
下一步是创建一个controller去处理文件上传. 除了在方法参数中使用的是MultipartHttpServletRequest或者MultipartFile以外,这个controller非常像一个被@Controller注解的控制器.
    @Controller
    public class FileUploadController {
        @RequestMapping(value = "/form", method = RequestMethod.POST)
        public String handleFormUpload(@RequestParam("name") String name, @RequestParam("file") MultipartFile file) {
              if (!file.isEmpty()) {
                  byte[] bytes = file.getBytes();
                  // store the bytes somewhere
                  return "redirect:uploadSuccess";
              }
              return "redirect:uploadFailure";
        }
    }
注意方法参数中@RequstParam中指定的参数名称和表单中声明的元素的对应关系.在这个例子中没有处理这个byte[],但是在实践中,你可以将它保存在数据库中,保存在文件系统中,等等.
当使用Servlet3.0的多块解析的时候,可以使用javax.servlet.http.Part作为方法参数
    @Controller
    public class FileUploadController {
        @RequestMapping(value = "/form", method = RequestMethod.POST)
        public String handleFormUpload(@RequestParam("name") String name, @RequestParam("file") Part file) {
              InputStream inputStream = file.getInputStream();
              // store bytes from uploaded file somewhere
              return "redirect:uploadSuccess";
        }
    }
Handling a file upload request from programmatic clients
多块请求(Multipart request)也可以在一个RESTful的服务场景下从一个非浏览器的客户端进行提交.上面所有的例子和配置在这里都适用.但是,和浏览器提交文件通过指定简单的表单属性不一样,编程式的客户端在指定的文本类型下可以发送更加复杂的数据,例如使用文件的多块请求,第二部分使用JSON格式的数据:
    POST /someUrl
    Content-Type: multipart/mixed
    --edt7Tfrdusa7r3lNQc79vXuhIIMlatb7PQg7Vp
    Content-Disposition: form-data; name="meta-data"
    Content-Type: application/json; charset=UTF-8
    Content-Transfer-Encoding: 8bit
    {
      "name": "value"
    }
    --edt7Tfrdusa7r3lNQc79vXuhIIMlatb7PQg7Vp
    Content-Disposition: form-data; name="file-data"; filename="file.properties"
    Content-Type: text/xml
    Content-Transfer-Encodi
在控制器的方法参数中可以使用@RequestParam("meta-data") String metadata来访问”meta-data”部分.但是,你可能更加喜欢接收一个由JSON数据填充的强类型对象,和@RequestBody通过HttpMessageConverter转换非多块请求到一个目标对象上的用法是类似的.
为了这个目的,也可以使用@RequestPart注解代替@RequestParam注解.它允许你通过HttpMessageConverter考虑请求头中的Content-Type获得指定多块的内容.
    @RequestMapping(value="/someUrl", method = RequestMethod.POST)
    public String onSubmit(@RequestPart("meta-data") MetaData metadata,
                @RequestPart("file-data") MultipartFile file) {
        // ...
    }
注意MultipartFile方法参数是怎么使用@RequestParam和@RequstPart互换的.但是,@RequestPart("meta-data") MetaData方法参数在这个例子中是使用基于Content-Type请求头和MappingJackson2HttpMessageConverter解析器的帮助去读取JSON内容的.
Handling Standard Spring MVC Exceptions
springMVC在处理请求的时候可能会抛出一些异常.SimpleMappingExceptionResolver可以简单的映射任何异常到一个默认的错误页面.但是,当客户端以自动的方式翻译返回信息的时候,你可能想要指定应答中的状态码.根据不同的异常,获取需要表明是客户端错误(4XX)或者服务端错误(5XX).
DefaultHandlerExceptionResolver可以翻译springMVC的异常到一个指定的错误状态码.它默认注册在MVC的命名空间,java配置,和DispatcherServlet下.下面的列表是这个解析器将异常转换为相关的状态码:
-
Exception HTTP Status Code -
BindException 400 -
ConversionNotSupportedException 500 -
HttpMediaTypeNotAcceptableException 406(not Acceptable) -
HttpMediaTypeNotSupportedException 415(Unsupported Medis Type) -
HttpMessageNotReadableException 400 -
HttpMessageNotWritableException 500 -
HttpRequestMethodNotSupportedException 405(Method Not Allowed) -
MethodArgumentNotValidException 400 -
MissingServletRequestParameterException 400 -
MissingServletRequestPartException 400 -
NoHandlerFoundException 404 -
NoSuchRequestHandlingMethodException 404 -
TypeMismatchException 400
DefaultHandlerExceptionResolver会转换异常,将对应的状态写入应答体中.但是,它不会往应答体中写入任何错误信息内容,然而,你的应用可能需要为每一个错误应答增加友好的内容,例如支持一个 RESTful API 的时候.你可以通过一个视图解析器准备一个ModelAndView用来渲染错误信息内容,或者配置一个ContentNegotiatingViewResolver,MappingJackson2JsonView等等,但是更加建议使用@ExceptionHandler方法来替代上面的方式.
如果比较喜欢使用@ExceptionHandler注解的方法来写入错误内容信息,可以使用继承ResponseEntityExceptionHandler的方式来做.在@ControllerAdvice类中提供一个@ExceptionHandler方法来处理标准的springMVC异常并放回ResponseEntity. 这样做允许你定制应答体并使用信息转换器(message converters)写入错误信息内容.查看ResponseEntityExceptionHandler的文档获取更多细节.
Annotating Business Exceptions With @ResponseStatus
一个业务产生的异常可以使用@ResponseStatus注解.当异常被抛出的时候,ResponseStatusExceptionResovler会设置相关的状态码.默认情况下DispatcherServlet会注册一个ResponseStatusExceptionResovler用来使用.
Customizing the Default Servlet Container Error Page
当应答体状态被设置为一个错误的状态码并且应答体为空的时候,Servlet容器可以统一渲染一个html的错误页面.可以在web.xml中使用<error-page>元素来定制默认的错误页面.直到Servlet3为止,这个元素必须映射一个指定的状态码或者异常类型.从Servlet3开始,错误页面不再需要映射,通过指定位置定制默认的Servlet容器错误页面是更加有效的方式.
    <error-page>
        <location>/error</location>
    </error-page>
注意,错误页面真实的位置可以是一个JSP页面或者一些其他的在容器中通过@Controller标注的处理方法.
当写入错误信息的时候,错误信息和状态码被设置在HttpServletResponse中了,可以通过控制器的请求属性进行访问:
    @Controller
    public class ErrorController {
        @RequestMapping(value="/error", produces="application/json")
        @ResponseBody
        public Map<String, Object> handle(HttpServletRequest request) {
            Map<String, Object> map = new HashMap<String, Object>();
            map.put("status", request.getAttribute("javax.servlet.error.status_code"));
            map.put("reason", request.getAttribute("javax.servlet.error.message"));
            return map;
        }
    }
如果是在JSP页面中:
    <%@ page contentType="application/json" pageEncoding="UTF-8"%>
    {
        status:<%=request.getAttribute("javax.servlet.error.status_code") %>,
        reason:<%=request.getAttribute("javax.servlet.error.message") %>
    }
Web Security
spring Security项目提供从一个恶意攻击中保护web项目按钮的特性.查看CSRF保护,Security Response Headers以及spring mvc integration章节.注意,使用Spring Security去保护应用并不要求所有的特性.例如 CSRF保护可以通过在配置中增加CsrfFitler和CsrfRequestDataValueProcessor来做.这是一个使用这个配置的例子.
其他的选择,可以选择一个专用框架来保证web应用的安全.HDIV就是其中一个可以和springMVC整合的框架.
Convention over configuration support (约定由于配置支持)
对于大多数的项目,坚持既定的约定并且有理由的设置合理的默认值.Spring Web MVC 有一个明确的约定优于配置的支持.意思就是如果你建立了一个类似命名约定的集合,你可以大幅的减少请求映射,视图解析器,ModelAndView等等的配置.这是一个使用问候快速原型的福利,它也可以在选择移动到生成环境时保存一致性.
MVC的约定由于配置的支持有三个核心模块:models,views,和 controllers
The Controller ControllerClassNameHandlerMapping
ControllerClassNameHandlerMapping是HandlerMapping的一个实现,使用约定去决定url请求和Controller之间的映射关系. 考虑下面一个简单的Controller的实现,特别注意类的名字.
    public class ViewShoppingCartController implements Controller {
          public ModelAndView handleRequest(HttpServletRequest request, HttpServletResponse response) {
              // the implementation is not hugely important for this example...
          }
    }
下面是Spring Web MVC配置文件的相关的片段:
    <bean class="org.springframework.web.servlet.mvc.support.ControllerClassNameHandlerMapping"/>
    <bean id="viewShoppingCart" class="x.y.z.ViewShoppingCartController">
          <!-- inject dependencies as required... -->
    </bean>
ControllerClassNameHandlerMapping查找在上下文中定义的所有的处理bean定义,并且从名字中剥去Controller,来作为请求映射,因此ViewShoppingCartController映射所有 /viewshoppingcart*的url请求.下面是一些使用的例子:
- WelcomeController maps to the /welcome* request URL
- HomeController maps to the /home* request URL
- IndexController maps to the /index* request URL
- RegisterController maps to the /register* request URL
如果是MultiActionController的处理类.则url映射关系为:
- AdminController maps to the /admin/* request URL
- CatalogController maps to the /catalog/* request URL
如果遵循了这种使用xxxController实现Controller的命名约定,则ControllerClassNameHandlerMapping可以减少类似使用SimpleUrlHandlerMapping时乏味的配置.
ControllerClassNameHandlerMapping继承自AbstractHandlerMapping,所以,也可以像使用其他HandlerMapping实现一样定义HandlerInterceptor和其他一切事情.
The Model ModelMap (ModelAndView)
ModelMap类实质上是一个包装的Map,它可以通过一个通用的命名约定使增加的对象展示在View.考虑下面的Controller实现,注意那个增加进ModelAndView并且没有指定名字的对象.
    public class DisplayShoppingCartController implements Controller {
        public ModelAndView handleRequest(HttpServletRequest request, HttpServletResponse response) {
            List cartItems = // get a List of CartItem objects
            User user = // get the User doing the shopping
            ModelAndView mav = new ModelAndView("displayShoppingCart"); <-- the logical view name
            mav.addObject(cartItems); <-- look ma, no name, just the object
            mav.addObject(user); <-- and again ma!
            return mav;
        }
    }
ModelAndView类使用ModelMap这个定制的Map实现,在对象加入ModelMap时会自动生成一个key,决定增加的对象名字的策略是:如果是一个纯粹的对象(比如User).会使用对象的短类名作为对象名.下面是一些例子:
- 类
x.y.User的实例引用名称为 user - 类
x.y.Registration的实例引用名称为 registration. - 类
java.util.HashMap实例应用名称为 hashMap.(这样做,表达对象不太直观) - 增加一个
null,会抛出IllegalArgumentException异常. (如果想增加一个null,则可以通过明确的指定它的名字来做).
注意:springMVC约定优于配置支持 不支持自动多元化,因此,你不能增加一个Person的List对象到一个ModelAndView,并期待生成的名字为people.这个决定是经过了一系列讨论的,最后坚持了”最小惊喜原则”(Principle of Least Surprise)
下面是放入Set或者List的名字生成策略:
- An x.y.User[] array with zero or more x.y.User elements added will have the name userList generated.
- An x.y.Foo[] array with zero or more x.y.User elements added will have the name fooList generated.
- A java.util.ArrayList with one or more x.y.User elements added will have the name userList generated.
- A java.util.HashSet with one or more x.y.Foo elements added will have the name fooList generated.
- An empty java.util.ArrayList will not be added at all (in effect, the addObject(..) call will essentially be a no-op).
The View - RequestToViewNameTranslator
RequestToViewNameTranslator接口在没有明确提供一个逻辑视图名称时决定了一个逻辑视图名称,只有DefaultRequestToViewNameTranslator一个实现.下面的例子简单说明DefaultRequestToViewNameTranslator如何映射url和逻辑视图名称.
    public class RegistrationController implements Controller {
        public ModelAndView handleRequest(HttpServletRequest request, HttpServletResponse response) {
            // process the request...
            ModelAndView mav = new ModelAndView();
            // add data as necessary to the model...
            return mav;
            // notice that no View or logical view name has been set
        }
    }
    <?xml version="1.0" encoding="UTF-8"?>
    <beans xmlns="http://www.springframework.org/schema/beans"
    xmlns:xsi="http://www.w3.org/2001/XMLSchema-instance"
    xsi:schemaLocation="
    http://www.springframework.org/schema/beans
    http://www.springframework.org/schema/beans/spring-beans.xsd">
        <!-- this bean with the well known name generates view names for us -->
        <bean id="viewNameTranslator" class="org.springframework.web.servlet.view.DefaultRequestToViewNameTranslator"/>
            <bean class="x.y.RegistrationController">
            <!-- inject dependencies as necessary -->
        </bean>
        <!-- maps request URLs to Controller names -->
        <bean class="org.springframework.web.servlet.mvc.support.ControllerClassNameHandlerMapping"/>
        <bean id="viewResolver" class="org.springframework.web.servlet.view.InternalResourceViewResolver">
            <property name="prefix" value="/WEB-INF/jsp/"/>
            <property name="suffix" value=".jsp"/>
        </bean>
    </beans>
注意handleRequest(...)方法没有指定逻辑视图名称,DefaultRequestToViewNameTranslator决定的逻辑视图名称是 registration, 逻辑视图名称会由InternalResourceViewResolver映射到 /WEB-INFO/jsp/registration.jsp文件.
小提示:其实无需明确指定DefaultRequestToViewNameTranslatorbean.DispatcherServlet在没有明确配置的情况下会自己实例化一个DefaultRequestToViewNameTranslator对象来使用.
如果需要覆盖默认配置,则需要明确的指定定制的DefaultRequestToViewNameTranslatorBean.可在DefaultRequestToViewNameTranslator的java文档中查看具体的属性配置细节
ETag support
Code-based Servlet container initialization
使用编码方式的servlet容器初始化.
Configuring Spring MVC
有两种SpringMVC的配置方式
- 基于java代码的配置
- 基于MVC XML命名空间的配置
基于java代码的配置可见更加简单的看到底层配置,也可以更加细粒度的定制SpringMVC bean.
Enabling the MVC Java Config or the MVC XML Namespace
开启基于java代码的配置,在@Configuration类上增加@EnableWebMvc注解
    @Configuration
    @EnableWebMvc
    public class WebConfig {
    }
基于XML配置的方式开启
      <?xml version="1.0" encoding="UTF-8"?>
      <beans xmlns="http://www.springframework.org/schema/beans"
      xmlns:mvc="http://www.springframework.org/schema/mvc"
      xmlns:xsi="http://www.w3.org/2001/XMLSchema-instance"
      xsi:schemaLocation="
          http://www.springframework.org/schema/beans
          http://www.springframework.org/schema/beans/spring-beans.xsd
          http://www.springframework.org/schema/mvc
          http://www.springframework.org/schema/mvc/spring-mvc.xsd">
            <mvc:annotation-driven/>
      </beans>
上面的配置会注册RequestMappingHandlerMapping,RequestMappingHandlerAdapter,ExceptionHandlerExceptionResolver等等一些处理器用来支持使用@RequestMapping,@ExceptionHandler等的注解使用.同时也会开启下面的配置
- 通过一个
ConversionService实例做Spring3风格的类型转换,此外也用于javaBean的属性绑定 - 通过
ConversionService支持@NumberFormat注解 - 支持使用了
@DateTimeFormat注解的Date,Calendar,Long和Joda Time - 如果在类路径下提供JSR-303的支持,则支持在
@Controller中使用@Valid注解进行校验 - 对
@RequestMapping或者@ExceptionHandler方法的@RequestBody方法参数和@ResponseBody方法的返回进行http信息转换支持.通过mvc:annotation-driven开启的信息转换的完整集合:ByteArrayHttpMessageConverterStringHttpMessageConverterResourceHttpMessageConverter对所有媒体类型org.springframework.core.io.Resource的相互转换SourceHttpMessageConverter对javax.xml.transform.Source的相互转换FormHttpMessageConverter对MultiValueMap<String,String>的相互转换Jaxb2RootElementHttpMessageConverter对 java对象和xml文件的相互转换. - 如果在类路径下支持Jackson2MappingJackson2XmlHttpMessageConverter和xml文件的相互转换 - 在类路径下支持Jackson2 xml extension.AtomFeedHttpMessageConverterAtomFeedHttpMessageConverter converts Atom feeds — added if Rome is present on the classpath.(这个什么鬼?)RssChannelHttpMessageConverterRssChannelHttpMessageConverter converts RSS feeds — added if Rome is present on the classpath.(这个又是什么鬼?)
Customizing the Provided Configuration
使用代码的方式覆盖默认配置,只需简单实现WebMvcConfigurer接口或者继承WebMvcConfigurerAdapter即可实现定制默认配置.WebMvcConfigurer文档,例子:
      @Configuration
      @EnableWebMvc
      public class WebConfig extends WebMvcConfigurerAdapter {
            @Override
            protected void addFormatters(FormatterRegistry registry) {
              // Add formatters and/or converters
            }

            @Override
            public void configureMessageConverters(List<HttpMessageConverter<?>> converters) {
              // Configure the list of HttpMessageConverters to use
            }
      }
使用配置的方式定制默认配置(springMVC XML schema):
    <mvc:annotation-driven conversion-service="conversionService">
    <mvc:message-converters>
    <bean class="org.example.MyHttpMessageConverter"/>
    <bean class="org.example.MyOtherHttpMessageConverter"/>
    </mvc:message-converters>
    </mvc:annotation-driven>
    <bean id="conversionService" class="org.springframework.format.support.FormattingConversionServiceFactoryBean">
        <property name="formatters">
            <list>
                <bean class="org.example.MyFormatter"/>
                <bean class="org.example.MyOtherFormatter"/>
            </list>
        </property>
    </bean>
Interceptors
可以使用 HandlerInterceptors 或者 WebRequestInterceptors映射指定请求url
java代码方式:
    @Configuration
    @EnableWebMvc
    public class WebConfig extends WebMvcConfigurerAdapter {
      @Override
      public void addInterceptors(InterceptorRegistry registry) {
          registry.addInterceptor(new LocaleInterceptor());
          registry.addInterceptor(new ThemeInterceptor()).addPathPatterns("/**").excludePathPatterns("/admin/**");
          registry.addInterceptor(new SecurityInterceptor()).addPathPatterns("/secure/\*");
      }
    }
XML文件配置:
    <mvc:interceptors>
        <bean class="org.springframework.web.servlet.i18n.LocaleChangeInterceptor"/>
        <mvc:interceptor>
            <mvc:mapping path="/\**"/>
            <mvc:exclude-mapping path="/admin/\**"/>
            <bean class="org.springframework.web.servlet.theme.ThemeChangeInterceptor"/>
        </mvc:interceptor>

        <mvc:interceptor>
            <mvc:mapping path="/secure/\*"/>
            <bean class="org.example.SecurityInterceptor"/>
        </mvc:interceptor>
    </mvc:interceptors>
Content Negotiation
可以通过请求中媒体类型来决定映射请求.可选的配置是检查url路径中的文件扩展名,检查Accept请求头,一个指定的查询参数,或者当不请求任何东西时返回一个默认的文本类型.默认的配置是,首先检查url的扩展名,其次在检查Accept请求头.
默认请求下,如果在类路径下有相关的依赖,MVC命名空间中java配置会注册json,xml,rss,atom.可通过明确的注册来指定额外的映射关系,也可配置一个有效的白名单作为安全扩展名,用来预防 RFD 攻击检查
下面是使用java配置的具体例子:
    @Configuration
    @EnableWebMvc
    public class WebConfig extends WebMvcConfigurerAdapter {
        @Override
        public void configureContentNegotiation(ContentNegotiationConfigurer configurer) {
            configurer.mediaType("json", MediaType.APPLICATION_JSON);
        }
    }
在MVC命名空间下, <mvc:annotation-driven>有一个content-negotiation-manager属性.期望值是一个ContentNegotiationManager,可以由一个ContentNegotiationManagerFactoryBean来创建:
    <mvc:annotation-driven content-negotiation-manager="contentNegotiationManager"/>
    <bean id="contentNegotiationManager" class="org.springframework.web.accept.ContentNegotiationManagerFactoryBean">
        <property name="mediaTypes" >
            <value>
                json=application/json
                xml=application/xml
            </value>
        </property>
    </bean>
如果没有使用MVC的java配置或者命名空间配置,则需要创建一个ContentNegotiationManager的实例,并且用它来配置RequestMappingHandlerMapping,RequestMappingHandlerAdapter和ExceptionHandlerExceptionResolver.
注意ContentNegotiatingViewResolver也可以用一个ContentNegotiationManager来配置,所以可以在整个springMVC中使用一个引用..
更多的建议例子中,可以配置多个ContentNegotiationManager实例,分别包含一个定制的ContentNegotiationStrategy实例.例如,你可以使用处理媒体配置为application/json的ContentNegotiationManager配置ExceptionHandlerExceptionResolver.或者你可以使用一些逻辑来定制使用媒体类型的策略.
View Controllers
这是定义一个ParameterizableViewController的捷径,在执行的时候,它会立即跳转到一个视图.在没有逻辑控制器执行前就会返回response.
下面是一个映射”/”到一个叫”home”的视图的例子:
      @Configuration
      @EnableWebMvc
      public class WebConfig extends WebMvcConfigurerAdapter {
          @Override
          public void addViewControllers(ViewControllerRegistry registry) {
              registry.addViewController("/").setViewName("home");
          }
      }
xml中的配置如下:
<mvc:view-controller path="/" view-name="home"/>
View Resolvers
MVC的视图解决器注册非常简单.下面的例子是使用FreeMarker HTML模板 和 Jackson作为默认视图渲染,配置内容协商视图的一个解决方案:
    @Configuration
    @EnableWebMvc
    public class WebConfig extends WebMvcConfigurerAdapter {
        @Override
        public void configureViewResolvers(ViewResolverRegistry registry) {
            registry.enableContentNegotiation(new MappingJackson2JsonView());
            registry.jsp();
        }
    }
xml文件中,可按如下配置:
    <mvc:view-resolvers>
      <mvc:content-negotiation>
        <mvc:default-views>
          <bean class="org.springframework.web.servlet.view.json.MappingJackson2JsonView"/>
        </mvc:default-views>
      </mvc:content-negotiation>
      <mvc:jsp/>
    </mvc:view-resolvers>
注意,FreeMarter,Velocity,Tiles,和Groovy Markup都需要配置底层的视图技术
MVC命名空间下提供专用的元素;来进行配置,如下是一个使用FreeMarter的配置:
    <mvc:view-resolvers>
        <mvc:content-negotiation>
            <mvc:default-views>
                <bean class="org.springframework.web.servlet.view.json.MappingJackson2JsonView"/>
            </mvc:default-views>
        </mvc:content-negotiation>
        <mvc:freemarker cache="false"/>
    </mvc:view-resolvers>

    <mvc:freemarker-configurer>
        <mvc:template-loader-path location="/freemarker"/>
    </mvc:freemarker-configurer
使用java代码的配置:
    @Configuration
    @EnableWebMvc
    public class WebConfig extends WebMvcConfigurerAdapter {
        @Override
        public void configureViewResolvers(ViewResolverRegistry registry) {
            registry.enableContentNegotiation(new MappingJackson2JsonView());
            registry.freeMarker().cache(false);
        }

        @Bean
        public FreeMarkerConfigurer freeMarkerConfigurer() {
            FreeMarkerConfigurer configurer = new FreeMarkerConfigurer();
            configurer.setTemplateLoaderPath("/WEB-INF/");
            return configurer;
        }
    }
Serving of Resources
这个选项通过ResourceHttpRequestHandler配置 Resource位置 允许一个指定的url正则表达式请求资源文件.支持一个方便的方式服务静态资源文件.cache-period属性可以用来设置过期时间(Page Speed 和 YSlow 建议设置为1年),可以使客户端更加高效的使用.这个处理器也会评估last-modification请求头(如果有的话),适当的情况下返回304.避免已经在客户端缓存了资源的不必要的请求.下面的例子是,映射url正则/resources/**到一个应用根目录的public-resources文件夹下面.
    @Configuration
    @EnableWebMvc
    public class WebConfig extends WebMvcConfigurerAdapter {
        @Override
        public void addResourceHandlers(ResourceHandlerRegistry registry) {
            registry.addResourceHandler("/resources/**").addResourceLocations("/public-resources/");
        }
    }
xml文件中的配置:
<mvc:resources mapping="/resources/**" location="/public-resources/"/>
使用一年的缓存有效期设置,保证最大程度的浏览器使用和减少http请求. Java代码配置:
      @Configuration
      @EnableWebMvc
      public class WebConfig extends WebMvcConfigurerAdapter {
          @Override
          public void addResourceHandlers(ResourceHandlerRegistry registry) {
              registry.addResourceHandler("/resources/\**").addResourceLocations("/public-resources/").setCachePeriod(31556926);
          }
      }
xml文件中的配置:
<mvc:resources mapping="/resources/\**" location="/public-resources/" cache-period="31556926"/>
上面的mapping属性是一个Ant 风格的正则表达式(由SimpleUrlHandlerMapping使用),location属性指定一个或多个有效的资源文件夹位置(多资源文件夹使用逗号分割).下面的例子是配置一个类路径下的文件夹:
java代码配置:
      @EnableWebMvc
      @Configuration
      public class WebConfig extends WebMvcConfigurerAdapter {
            @Override
            public void addResourceHandlers(ResourceHandlerRegistry registry) {
                registry.addResourceHandler("/resources/\**").addResourceLocations("/", "classpath:/META-INF/public-web-resources/");
            }
      }
xml文件配置:
<mvc:resources mapping="/resources/\**" location="/, classpath:/META-INF/public-web-resources/"/>
当服务器端重新部署了一个新版本的资源文件时.你可能需要强制客户端去请求一个新的部署版本. 版本化的URL由framework和一个配置的资源处理链支持.资源处理链由一个或多个ResourceResoulver和一个或者多个ResourceTransformer实例组成.他们一起可以提供任意解决方案和资源转换.
VersionResourceResolver可以根据不同的策略来配置.例如FixedVersionStrategy可以使用一个属性,一个日期,或者其他的信息来作为版本号.ContentVersionStrategy使用请求的content来急速MD5码作为版本号(known as “fingerprinting” URLs)ContentVersionStrategy是一个好的默认选择,除了不可用的情况(例如一个JavaScript模块加载)
可以对不同的url模板使用不同的版本策略,请记住 基于content计算版本号的方式是非常昂贵的,所以在生产环境对资源链应该开启缓存
java配置例子:
    @Configuration
    @EnableWebMvc
    public class WebConfig extends WebMvcConfigurerAdapter {
        @Override
        public void addResourceHandlers(ResourceHandlerRegistry registry) {
            registry.addResourceHandler("/resources/\**")
                    .addResourceLocations("/public-resources/")
                    .resourceChain(true).addResolver(
                        new VersionResourceResolver().addContentVersionStrategy("/\**"));
        }
    }
xml文件配置例子:
      <mvc:resources mapping="/resources/**" location="/public-resources/">
          <mvc:resource-chain>
              <mvc:resource-cache />
              <mvc:resolvers>
                <mvc:version-resolver>
                    <mvc:content-version-strategy patterns="/**"/>
                </mvc:version-resolver>
              </mvc:resolvers>
          </mvc:resource-chain>
      </mvc:resources>
为了使上面的配置工作,应用也必须使用版本号渲染url,一个简单的方式是配置一个ResourceUrlEncodingFilter,用来包装response和覆盖encodeUrl方法.这在JSP,FreeMarker,Velocity和任何和会调用encodeURL方法来应答的视图技术中都能正常工作.此外,应用也可以直接使用ResourceUrlProviderbean,它会自动使用java配置和MVC命名空间声明使用.
Falling Back On the “Default” Servlet To Serve Resources
这个是允许DispatcherServlet映射到”/”上(也就是覆盖了容器默认的Servlet),然而,这样也仍然允许静态资源请求由容器的默认Servlet来处理.使用URL映射”/**“和最低优先级配置一个DefaultServletHttpRequestHandler映射到其他URL上.
这个处理器会forword跳转所有请求到默认的Servlet上.因此,有个最重要的事情就是它必须放在所有URLHandlerMappings的最后.这里需要小心的是,如果你使用了<mvc:annotation-driven>或者你自己定制的HandlerMapping实例,请确保排序属性order小于DefaultServletHttpRequestHandler的排序属性(Integer.MAX_VALUE).
使用默认配置开启这个特性:
    @Configuration
    @EnableWebMvc
    public class WebConfig extends WebMvcConfigurerAdapter {
        @Override
        public void configureDefaultServletHandling(DefaultServletHandlerConfigurer configurer) {
            configurer.enable();
        }
    }
或者在xml文件中:
<mvc:default-servlet-handler/>
使用”/”servlet映射RequestDispatcher有个警告,就是这个默认Servlet是通过名字来检索的,而不是路径.在容器启动的时候DefaultServletHttpRequestHandler会尝试自动关联默认Servlet,对于已知的大多数主要Servlet容器来说,都是这样(包括Tomcat,Jetty,GlassFish,JBoss,Resin,WebLogic,和WebSphere).如果默认的Servlet已经使用一个不同的名字来定制,或者一个不同的Servlet 容器使用的默认Servlet名称是未知的,则默认Servlet的名字必须像下面的例子一样指明:
    @Configuration
    @EnableWebMvc
    public class WebConfig extends WebMvcConfigurerAdapter {
      @Override
      public void configureDefaultServletHandling(DefaultServletHandlerConfigurer configurer) {
          configurer.enable("myCustomDefaultServlet");
      }
    }
或者在xml文件中配置:
<mvc:default-servlet-handler default-servlet-name="myCustomDefaultServlet"/>
Path Matching
这部分允许定制多种URL映射和路径映射的设置,更多细节,可查看PathMatchConfigurer文档.
下面是一个java代码的配置:
      @Configuration
      @EnableWebMvc
      public class WebConfig extends WebMvcConfigurerAdapter {
          @Override
          public void configurePathMatch(PathMatchConfigurer configurer) {
                  configurer
                        .setUseSuffixPatternMatch(true)
                        .setUseTrailingSlashMatch(false)
                        .setUseRegisteredSuffixPatternMatch(true)
                        .setPathMatcher(antPathMatcher())
                        .setUrlPathHelper(urlPathHelper());
          }

          @Bean
          public UrlPathHelper urlPathHelper() {
              //...
          }

          @Bean
          public PathMatcher antPathMatcher() {
              //...
          }
      }
在xml文件中使用<mvc:path-matching>元素,也是一样的:
    <mvc:annotation-driven>
        <mvc:path-matching
            suffix-pattern="true"
            trailing-slash="false"
            registered-suffixes-only="true"
            path-helper="pathHelper"
        path-matcher="pathMatcher"/>
    </mvc:annotation-driven>

    <bean id="pathHelper" class="org.example.app.MyPathHelper"/>
    <bean id="pathMatcher" class="org.example.app.MyPathMatcher"/>
Advanced Customizations with MVC Java Config
从上面的例子中你可以看到MVC的java配置和MVC的命名空间的配置支持高水平构建,并且不要求你有较深的Bean创建知识.它会帮助你集中焦点在你的应用需求上.但是,在某些点上,你可能需要更加细粒度的控制,或者你需要明白底层的配置.
如果要朝着更加细粒度的控制,你需要明白bean的创建.在MVC java的配置中,你可以查看java文档和WebMvcConfigurationSupport中的@Bean方法.在这个类中的配置会自动的通过@EnableWebMvc注解进行引入.实际上如果你打开@EnableWebMvc,你可以看到@Import声明.
下一步的更细粒度的控制是,定制WebMvcConfigurationSupport的beans创建属性.或者是支持你自己的实例.这个要求两件事情,1.移除@EnableWebMvc注解为了防止引入,2.扩展DelegatingWebMvcConfiguration.下面是一个WebMvcConfigurationSupport子类的例子:
    @Configuration
    public class WebConfig extends DelegatingWebMvcConfiguration {
        @Override
        public void addInterceptors(InterceptorRegistry registry){
            // ...
        }

        @Override
        @Bean
        public RequestMappingHandlerAdapter requestMappingHandlerAdapter() {
            // Create or let "super" create the adapter
            // Then customize one of its properties
        }
    }
注意:
一个应用应该有且只有一个DelegatingWebMvcConfiguration或者@EnableWebMvc注解类的配置.因为它们俩都是注册相同声明的beans.
使用这种方法修改beans,并不会妨碍你使用本章所示的任何更高级别的结构.WebMvcConfigurerAdapter子类和WebMvcConfigurer的实现仍然可以被使用.
Advanced Customizations with the MVC Namespace
使用MVC命名空间来做更加细粒度的控制会更加难一点.
如果需要更加细粒度的控制,而不是复制它提供的配置.可以考虑配置一个BeanPostProcessor用来关联你想要通过类型来定制然后修改必要属性的bean.下面是一个例子:
    @Component
    public class MyPostProcessor implements BeanPostProcessor {
        public Object postProcessBeforeInitialization(Object bean, String name) throws BeansException {
            if (bean instanceof RequestMappingHandlerAdapter) {
                // Modify properties of the adapter
            }
        }
    }
注意: 为了能够正常关联,MyPostProcessor需要被包含在一个<component scan />中,或者在xml文件中提供bean声明