[TOC]
简介
org.springframework.beans 和 org.springframework.context 这俩包是 Spring IoC容器的基础. BeanFactory接口提供任何类型对象的高级配置机制.ApplicationContext是
BeanFactory的一个子接口,在应用层指定一个它的实现(例如在web应用中使用WebApplicationContext)可以更好的与Spring的AOP,资源绑定,事件发布等特性集成.
总之就是,BeanFactory提供配置框架的基础功能.ApplicationContext增加了更多企业特性功能.
org.springframework.context.ApplicationContext是一个Spring IoC容器的一个代表,它负责对象的实例化,配置以及装配bean对象.容器通过读取配置元数据来做前面说的事情.配置元数据可以是XML文件,Java注解,也可以是Java代码.配置元数据用来表达你的应用程序中每个对象复制的依赖关系.
Spring对ApplicationContext提供了一些开箱即用的实现.在一个独立的应用中通常是创建一个ClassPathXmlApplicationContext或者FileSystemXmlApplicationContext实例.XML文件是定义一个配置元数据的传统方式,你也可以使用一点简单的XML配置来声明支持其他的一些元配置的方式(Java注解或者代码).
在大多数场景下,Spring IoC容器是不需要实例化多个的.
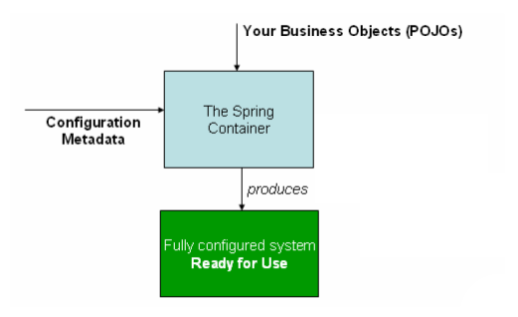
下图是Spring如何工作的一个简单说明:

一些可能使用到的注解:
- @Configuration
- @Bean : 作用在一个方法上,将该方法作为指定bean的创建工厂方法.
- @Import
- @DependsOn
- @ConstructorProperties 构造器注入参数
下面是xml文件配置的一个基本结构
    <?xml version="1.0" encoding="UTF-8"?>
    <beans xmlns="http://www.springframework.org/schema/beans"
        xmlns:xsi="http://www.w3.org/2001/XMLSchema-instance"
        xsi:schemaLocation="http://www.springframework.org/schema/beans
            http://www.springframework.org/schema/beans/spring-beans.xsd">

        <bean id="..." class="...">
        <!-- collaborators and configuration for this bean go here -->
        </bean>

        <bean id="..." class="...">
        <!-- collaborators and configuration for this bean go here -->
        </bean>

        <!-- more bean definitions go here -->

    </beans>
Spring IoC容器的实例化是非常简单的,可以使用下面的方式创建一个容器的实例(此容器回去CLASSPATH下面寻找配置文件):
    ApplicationContext context =
      new ClassPathXmlApplicationContext(new String[] {"services.xml", "daos.xml"});
当有多个配置文件时,可在其中一个配置文件中使用如下方式引入其他的配置文件:
  <beans>
      <!-- 必须和当前文件在同一个目录下面或者在classpath下面 -->
      <import resource="services.xml"/>

      <!-- 这两种方式是一样的,第三个中的'/'会被忽略掉 -->
      <import resource="resources/messageSource.xml"/>
      <import resource="/resources/themeSource.xml"/>

      <bean id="bean1" class="..."/>
      <bean id="bean2" class="..."/>
  </beans>
可使用下面的方式获取配置的bean
    // create and configure beans
    ApplicationContext context =
    new ClassPathXmlApplicationContext(new String[] {"services.xml", "daos.xml"});

    // retrieve configured instance
    PetStoreService service = context.getBean("petStore", PetStoreService.class);

    // use configured instance
    List<String> userList = service.getUsernameList();
Bean overview
bean的定义使用 BeanDefinition来描述.bean由以下细心来定义
- class : bean的实例化类,如果是内部类,则使用
com.example.Foo$Bar这中方式引用. - name : bean的名称(xml配置中的id属性), 一个bean全局唯一的标识.如果没有指定,spring会自己生成一个全局唯一的name
- scope :
- cnostructor auguments :
- properties :
- autowiring mode :
- lazy-initialization method
- destruction method
其他:
bean的id属性虽然是唯一的,但是可以使用<alias name="fromName" alias="toName"/> 给它命多个别名.(id和所有的别名,都指向同一个对象)
可以指定如下形式的工厂方法作为bean创建的方式:
  <bean id="clientService"
      class="examples.ClientService"
      factory-method="createInstance"/>
则在类中需提供如下的静态方法:
    public class ClientService {
        private static ClientService clientService = new ClientService();

        private ClientService() {}

        public static ClientService createInstance() {
            return clientService;
        }
    }
由或者使用某个实例的某个方法作为一个bean的创建方式:
    <bean id="serviceLocator" class="examples.DefaultServiceLocator">
    <!-- inject any dependencies required by this locator bean -->
    </bean>

    <bean id="clientService"
      factory-bean="serviceLocator"
      factory-method="createClientServiceInstance"/>

    <bean id="accountService"
      factory-bean="serviceLocator"
      factory-method="createAccountServiceInstance"/>
依赖注入的方式:
-
构造器注入
容器使用如下方式解决bean之间的依赖问题:
- ApplicationContext创建彬初始化一个配置元数据用来描述所有的beans.
- 对每一个bean来说,它的依赖以属性,构造器参数,或者静态工厂方法参数(需一个默认的无参构造器)的形式表示.
- 每一个属性或者构造器参数是一个真实定义的值集合或者在容器中的其他bean的一个引用.
- 每一个属性或者构造器参数指定的值会被转换成指定的类型.(默认情况下spring可以将一个字符串转换为例如int,long,string,boolean的这种内置类型)
如果应用中大部分都使用构造器注入,则可能出现循环依赖的问题,此时spring会抛出BeanCurrentlyInCreationException异常
spring会尽量延后执行对象的实例化,这意味着及时容器被正确的加载了,它也可能在你获取一个对象的时候,由于其自身创建失败或者它的依赖创建失败,而导致获取异常.(但是默认情况下,单例对象是预先实例化的.)
在配置bean属性时,可以使用下面的方式配置属性,
    <bean id="myDataSource" class="org.apache.commons.dbcp.BasicDataSource" destroy-method="close">
        <!-- results in a setDriverClassName(String) call -->
        <property name="driverClassName" value="com.mysql.jdbc.Driver"/>
        <property name="url" value="jdbc:mysql://localhost:3306/mydb"/>
        <property name="username" value="root"/>
        <property name="password" value="masterkaoli"/>
    </bean>
也可以使用 P 这个命名空间来配置属性,这种方式在IDE中有提示信息,可以减少拼写错误:
    <beans xmlns="http://www.springframework.org/schema/beans"
        xmlns:xsi="http://www.w3.org/2001/XMLSchema-instance"
        xmlns:p="http://www.springframework.org/schema/p"
        xsi:schemaLocation="http://www.springframework.org/schema/beans
            http://www.springframework.org/schema/beans/spring-beans.xsd">

        <bean id="myDataSource" class="org.apache.commons.dbcp.BasicDataSource"
            destroy-method="close"
            p:driverClassName="com.mysql.jdbc.Driver"
            p:url="jdbc:mysql://localhost:3306/mydb"
            p:username="root"
            p:password="masterkaoli"/>
    </beans>
也可以使用 java.util.Properties的实例来配置属性:
    <bean id="mappings"
        class="org.springframework.beans.factory.config.PropertyPlaceholderConfigurer">
            <!-- typed as a java.util.Properties -->
            <property name="properties">
            <value>
                jdbc.driver.className=com.mysql.jdbc.Driver
                jdbc.url=jdbc:mysql://localhost:3306/mydb
            </value>
        </property>
    </bean>
bean的idref可唯一指定一个bean引用:
    <bean id="theTargetBean" class="..."/>
    <bean id="theClientBean" class="...">
        <property name="targetName">
            <idref bean="theTargetBean" />
        </property>
    </bean>
还有第二种方式:
    <bean id="theTargetBean" class="..." />
    <bean id="client" class="...">
        <property name="targetName" value="theTargetBean" />
    </bean>
但是第一种使用idref的方式比第二种方式要好,因为使用idref,在容器初始化的时候就会校验这个bean是否存在,而使用第二中方式,如果有拼写错误,则只会在 client这个bean真正被实例化的时候才发现.而且如果client是一个prototype的bean,则这个拼写错误可能会在容器运行很久以后才发现.(在spring4.0中已经不支持idref中local属性了,local属性配置是指在同一个bean工厂xml文件中的bean)
使用parent元素可以引用当前容器的父容器中的bean,这个主要是在你想在当前容器中包装父容器中的bean时使用的(注意两个容器中的bean的id要一样).
    <!-- in the parent context -->
    <bean id="accountService" class="com.foo.SimpleAccountService">
    <!-- insert dependencies as required as here -->
    </bean>

    <!-- in the child (descendant) context -->
    <bean id="accountService" <!-- bean name is the same as the parent bean -->
        class="org.springframework.aop.framework.ProxyFactoryBean">
        <property name="target">
            <ref parent="accountService"/> <!-- notice how we refer to the parent bean -->
        </property>
        <!-- insert other configuration and dependencies as required here -->
    </bean>
inner bean (就算指定了inner bean的id属性,也是无法在别的bean中引用它的):
    <bean id="outer" class="...">
      <!-- instead of using a reference to a target bean, simply define the target bean inline -->
      <property name="target">
        <bean class="com.example.Person"> <!-- this is the inner bean -->
          <property name="name" value="Fiona Apple"/>
          <property name="age" value="25"/>
        </bean>
      </property>
    </bean>
集合属性():
  <bean id="moreComplexObject" class="example.ComplexObject">
  <!-- results in a setAdminEmails(java.util.Properties) call -->
      <property name="adminEmails">
        <props>
          <prop key="administrator">administrator@example.org</prop>
          <prop key="support">support@example.org</prop>
          <prop key="development">development@example.org</prop>
        </props>
      </property>
  <!-- results in a setSomeList(java.util.List) call -->
      <property name="someList">
          <list>
              <value>a list element followed by a reference</value>
              <ref bean="myDataSource" />
          </list>
      </property>
  <!-- results in a setSomeMap(java.util.Map) call -->
      <property name="someMap">
        <map>
          <entry key="an entry" value="just some string"/>
          <entry key ="a ref" value-ref="myDataSource"/>
        </map>
      </property>
  <!-- results in a setSomeSet(java.util.Set) call -->
      <property name="someSet">
          <set>
            <value>just some string</value>
            <ref bean="myDataSource" />
          </set>
      </property>
  </bean>
集合合并:
    <beans>
        <bean id="parent" abstract="true" class="example.ComplexObject">
            <property name="adminEmails">
                <props>
                    <prop key="administrator">administrator@example.com</prop>
                    <prop key="support">support@example.com</prop>
                </props>
            </property>
        </bean>

        <bean id="child" parent="parent">
            <property name="adminEmails">
                <!-- the merge is specified on the child collection definition -->
                <props merge="true">
                    <prop key="sales">sales@example.com</prop>
                    <prop key="support">support@example.co.uk</prop>
                </props>
            </property>
        </bean>
    <beans>
将某个属性设置为null
    <bean class="ExampleBean">
        <property name="email">
            <null/>
        </property>
    </bean>
P命名空间是对属性的快捷赋值方式,还可使用C命名空间对构造器参数快捷赋值:
    <beans xmlns="http://www.springframework.org/schema/beans"
        xmlns:xsi="http://www.w3.org/2001/XMLSchema-instance"
        xmlns:c="http://www.springframework.org/schema/c"
        xsi:schemaLocation="http://www.springframework.org/schema/beans
          http://www.springframework.org/schema/beans/spring-beans.xsd">

        <bean id="bar" class="x.y.Bar"/>
        <bean id="baz" class="x.y.Baz"/>

        <!-- traditional declaration -->
        <bean id="foo" class="x.y.Foo">
            <constructor-arg ref="bar"/>
            <constructor-arg ref="baz"/>
            <constructor-arg value="foo@bar.com"/>
        </bean>

        <!-- c-namespace declaration -->
        <bean id="foo" class="x.y.Foo" c:bar-ref="bar" c:baz-ref="baz" c:email="foo@bar.com"/>
    </beans>
深层对象赋值(bean对象foo的fred属性有一个bob属性,bob属性里面有一个sammy属性, 若没有则NPE):
    <bean id="foo" class="foo.Bar">
        <property name="fred.bob.sammy" value="123" />
    </bean>
使用 depends-on 在创建一个bean时,强行先初始化其他指定的bean
    <bean id="beanOne" class="ExampleBean" depends-on="manager,accountDao">
        <property name="manager" ref="manager" />
    </bean>

    <bean id="manager" class="ManagerBean" />
    <bean id="accountDao" class="x.y.jdbc.JdbcAccountDao" />
懒加载配置: 某一个bean:
<bean id="lazy" class="com.foo.ExpensiveToCreateBean" lazy-init="true"/>
全局配置
    <beans default-lazy-init="true">
        <!-- no beans will be pre-instantiated... -->
    </beans>
自动装配模式
- no : 默认不会自动装配,需要引用其他的bean,需要定义
ref元素 - byName : 通过名字自动装配,如果bean有个属性为master,则如果有setMaster(…)方法的话,则会自动装配
- byType : 通过类自动装配,如果有多个,则会抛异常,如果一个都没有,则为null
- constructor : 构造器装配,使用class类型匹配,如果存在多个,或者一个都不存在,则会抛出异常.
在<bean/>元素中的autowire-candidate可配置是否从自动装配中过滤掉本bean, <beans />中的全局配置default-autowire-candidates
轮询方法注入(Lookup Method Injection) 当在工厂中需要动态获取一个类的实例时,可使用如下的方式(spring使用CGLIB为类生成一个动态的子类,所以定义的类不能为final的,且方法也不能为final):
其中虚方法的定义按如下格式:<public|protected> [abstract] <return-type> theMethodName(no-arguments);
    public abstract class CommandManager {
        public Object process(Object commandState) {

            // grab a new instance of the appropriate Command interface
            Command command = createCommand();

            // set the state on the (hopefully brand new) Command instance
            command.setState(commandState);

            return command.execute();
        }

        // okay... but where is the implementation of this method?
        protected abstract Command createCommand();
    }
xml配置:
    <!-- a stateful bean deployed as a prototype (non-singleton) -->
    <bean id="command" class="fiona.apple.AsyncCommand" scope="prototype">
    <!-- inject dependencies here as required -->
    </bean>

    <!-- commandProcessor uses statefulCommandHelper -->
    <bean id="commandManager" class="fiona.apple.CommandManager">
    <lookup-method name="createCommand" bean="command"/>
    </bean>
替换任意对象的任意方法(Arbitrary method replacement)
待被替换方法:
    public class MyValueCalculator {
        public String computeValue(String input) {
            // some real code...
        }

        // some other methods...
    }
被替换方法的真实实现:
    // meant to be used to override the existing computeValue(String)
    // implementation in MyValueCalculator

    public class ReplacementComputeValue implements MethodReplacer {
        public Object reimplement(Object o, Method m, Object[] args) throws Throwable {
            // get the input value, work with it, and return a computed result
            String input = (String) args[0];
            ...
            return ...;
        }
    }
bean配置:
    <bean id="myValueCalculator" class="x.y.z.MyValueCalculator">
        <!-- arbitrary method replacement -->
        <replaced-method name="computeValue" replacer="replacementComputeValue">
            <arg-type>String</arg-type>
        </replaced-method>
    </bean>
    <bean id="replacementComputeValue" class="a.b.c.ReplacementComputeValue"/>
则在调用 myValueCalculator.computeValue() 会调用 ReplacementComputeValue.reimplement(...)方法
bean作用域(bean scope)
spring支持 5 种作用域,其中3种,只有在使用 webApplicationContext的时候才有用.
- singleton : spring默认就是单例模式,即所有bean都是单例的
- prototype : 这中作用域,每次获取的都是新bean
- request : 即每一个http请求中都会生成新的bean,在web环境的ApplicationContext中才有效
- session : http会话级别,每一个session对应不同的bean实例,在web环境的ApplicationContext中才有效
- global session:和上面那个session级别一样,这个只在portlet上下文并且web环境的ApplicationContext中有效.
- application : bean的生命周期是和ServletContext的生命周期一致的.在web环境的ApplicationContext中才有效
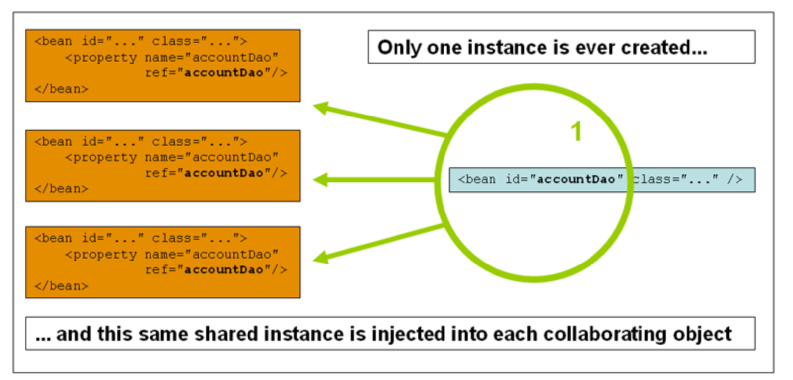
singleton的作用域说明:

prototype作用域说明:

在普通的ApplicationContext(例如ClassPathXmlApplicationContext)中使用后面几种作用域,会抛出IllegalStateException
使用org.springframework.beans.factory.config.Scope接口,自己实现这个接口,可以自定义作用域.
bean的生命周期回调
若bean实现了InitializingBean则在bean初始化完成后会调用接口的afterPropertiesSet()方法,若bean实现了DisposableBean,则会在bean销毁时调用接口的destroy()方法.
如果使用实现接口的方式,则和Spring框架耦合了,所以更好的方式是下面两种: 在JSR-250中可以使用
@PostConstruct和@PreDestroy注解来和spring框架解耦. 如果不想通过注解的方式解耦,则还可以在bean的配置信息中指定init-method和destroy-method
关于生命周期的回调:如果在一个项目中所有的开发者可以统一生命周期的方法名(例如:init(), destroy()),则可在元素<beans />中配置全局初始化或者销毁方法,spring容器会扫描每一个bean,在对应的生命周期时刻对方法进行调用,
例如配置所有bean的初始化方法为init():
    <beans default-init-method="init">
     .....
    </beans>
另外:由于spring的容器保证是在bean的所有依赖都被注入后,立即调用初始化回调方法.因此初始化方法是调用在原始目标bean的引用上.也就意味着AOP等操作还没有在这个bean上起作用.所以AOP等操作在初始化方法上不起作用.
上面说到了三种方式可以调用bean的生命周期回调(接口,注解,bean配置),如果一个bean同时拥有不止一种方式的回调方法的话,那么如果方法名称不同,则都会被调用,但是如果方法名称是一样的,则只会被调用一次.
可通过BeanPostProcessor接口,来自定义声明周期的回调.
启动和关闭的回调, 可以通过实现Lifecycle接口来实现(共三个方法start(),stop(),isrunning()),通过spring来管理的对象,只要实现了这个接口,则在ApplicationContext收到start或者stop信号(例如:在运行时的stop/restart信号),则会调用所有实现了Lifecycle接口的对象的对应方法.
并且Lifecycle的处理者LifecycleProcessor是它的一个子接口,新增加了两个方法(onRefresh()和onClose())用来在上下文进行刷新和关闭时对所有Lifecycle的实现进行调用.
注意Lifecycle接口只是一个明确的start/stop的提示,并不意味着在上下文刷新的时候会自动启动.如果需要自动启动则可以使用SmartLifecycle接口(扩展两个方法isAutoStartUp()和stop(Runable callback))来实现
SmartLifecycle接口继承的另外一个接口Phased(只有一个getPhase()方法)用来指定接口被调用顺序,当getPhase()方法返回Integer.MIN_VALUE时表示,对象会在启动时会在一个被调用,在停止时会在最后一个被调用,
LifecycleProcessor的默认实现是DefaultLifecycleProcessor(可设置每个阶段的对象stop的超时时间).
在非web项目中优雅的关闭spring容器(在web的ApplicationContext的实现中,已经有了优雅关闭spring容器的代码了):需要注册一个JVM关闭时的回调钩子.可通过调用在AbstractApplicationContext中定义的registerShutdownHook()方法来注册钩子,从而保证所有bean的销毁方法都被调用了.
实现了ApplicationContextAware接口的类,可以获得ApplicationContext的实例.
如果一个spring管理的bean实现了BeanNameAware接口,则可以获得这个bean在容器中对应的名称(设置名称的方法会在InitializingBean#afterPropertiesSet()等初始化方法执行之前被调用)
所有的Aware接口(使用这些接口则意味着你的代码和Spring的API绑定了):
- ApplicationContextAware
- ApplicationEventPublisherAware
- BeanClassLoaderAware
- BeanFactoryAware
- BeanNameAware
- BootstrapContextAware
- LoadTimeWeaverAware
- MessageSourceAware
- NotificationPublisherAware
- PortletConfigAware
- PortletContextAware
- ResourceLoaderAware
- ServletConfigAware
- ServletContextAware
Bean配置继承(parent元素,),可用来作为一个模板,减少配置量:
    <bean id="inheritedTestBean" abstract="true"
            class="org.springframework.beans.TestBean">
        <property name="name" value="parent"/>
        <property name="age" value="1"/>
    </bean>

    <bean id="inheritsWithDifferentClass"
            class="org.springframework.beans.DerivedTestBean"
            parent="inheritedTestBean" init-method="initialize">
        <property name="name" value="override"/>
    <!-- the age property value of 1 will be inherited from parent -->
    </bean>
容器扩展点
使用BeanPostProcessor接口,自定义bean初始化过程.(这个接口的postProcessBeforeInitialization()方法会在bean所有定义的初始化方法调用前执行,postProcessAfterInitialization()方法会在bean的所有销毁方法调用之后执行.), ApplicationContext会自动扫描所有实现了BeanPostProcessor接口的bean,将它注册到bean的处理器集合中.
使用BeanFactoryPostProcessor可修改bean的实际定义.
下面一个简单例子是在任何对象创建后,打印bean的toString()方法.
    public class InstantiationTracingBeanPostProcessor implements BeanPostProcessor {
    // simply return the instantiated bean as-is
    public Object postProcessBeforeInitialization(Object bean,
    String beanName) throws BeansException {
    return bean; // we could potentially return any object reference here...
    }
    public Object postProcessAfterInitialization(Object bean,
    String beanName) throws BeansException {
    System.out.println("Bean '" + beanName + "' created : " + bean.toString());
    return bean;
    }
    }
简单XML配置(下面的lang是spring的动态语言支持):
      <?xml version="1.0" encoding="UTF-8"?>
      <beans xmlns="http://www.springframework.org/schema/beans"
      xmlns:xsi="http://www.w3.org/2001/XMLSchema-instance"
      xmlns:lang="http://www.springframework.org/schema/lang"
      xsi:schemaLocation="http://www.springframework.org/schema/beans
      http://www.springframework.org/schema/beans/spring-beans.xsd
      http://www.springframework.org/schema/lang
      http://www.springframework.org/schema/lang/spring-lang.xsd">
      <lang:groovy id="messenger"
      script-source="classpath:org/springframework/scripting/groovy/Messenger.groovy">
      <lang:property name="message" value="Fiona Apple Is Just So Dreamy."/>
      </lang:groovy>
      <!--
      when the above bean (messenger) is instantiated, this custom
      BeanPostProcessor implementation will output the fact to the system console
      -->
      <bean class="scripting.InstantiationTracingBeanPostProcessor"/>
      </beans>
spring提供的BeanPostProcessor的其中一个实现是RequiredAnnotationBeanPostProcessor,会在使用了context:annotation-config和context:component-scan的xml标签是默认注册.它的作用是默认对每一个bean中所有被@Require注解标注的set方法进行检查,保证属性值一定不为null.(使用哪个注解来进行检查,可通过setRequiredAnnotationType(...)方法进行设置)
使用BeanFactoryPostProcessor定制配置元数据, BeanFactoryPostProcessor和BeanPostProcessor的语义类似.主要的不同是:BeanFactoryPostProcessor操作的是bean配置的元数据,Spring IoC容器允许在容器初始化任何bean前BeanFactoryPostProcessor的执行顺序读取并改变bean的配置信息.(可通过实现Ordered接口来指定多个BeanFactoryPostProcessor的执行顺序), 而且BeanFactoryPostProcessor是无法继承到子容器的,它只在配置它的当前容器上生效.
当把BeanFactoryPostProcessor声明到一个ApplicationContext中后,它会被立即执行(spring会自动检测使用所有这个接口的实现).Spring自d身包含了一系列的BeanFactoryPostProcessor(例如PropertyOverrideConfigurer和PropertyPlaceholderConfigurer属性占位符配置替换)
注意: BeanPostProcessor和BeanFactoryPostProcessor这两个接口实现的bean的全局懒加载属性会被忽略.即,就算在default-lazy-init懒加载属性为true也会被立即初始化.
PropertyPlaceholderConfigurer和PropertyOverrideConfigurer的差别是:PropertyPlaceholderConfigurer用占位符对应的值来替换占位符. 而PropertyOverrideConfigurer是属性配置,可以覆盖某一个bean的默认值(并且支持混合属性名称,例如foo.fred.bob.sammy=123表示的是将bean的属性foo属性对象的fred属性对象 的bob属性对象的 sammy属性设置为123).
使用FactoryBean定制bean初始化逻辑,它包含三个方法(getObject(),isSingleton和getObjectType()),当你想获取一个bean的FactoryBean对象时,可通过在bean的名称前面加”&”来获得.即,假如有一个bean的id为myBean,则当调用getBean("myBean")时就会产生一个它对应的FactoryBean对象,获取这个bean对应的FactoryBean对象的方式是getBean("&myBean")
基于注解的容器配置
xml中配置了<context:annotation-config/>(这个配置只在当前容器中起作用,例如只在WebApplicationContext中加了这个配置,则它只会处理controller)这个时,默认注册下面这些处理器:
AutowiredAnnotationBeanPostProcessor: 默认处理@Autowired和@Value注解(如果能加载到@javax.inject.Inject,则也会处理).也可自定义需注入依赖的注解类型CommonAnnotationBeanPostProcessor: 默认处理@javax.annotation.PostConstruct,javax.annotation.PreDestroy,javax.annotation.Resource和javax.xml.ws.WebServiceRef注解PersistenceAnnotationBeanPostProcessor(该类在spring-orm包中): 处理@javax.persistence.PersistenceUnit,@javax.persistence.PersistenceContext,@javax.persistence.EntityManagerFactory以及@javax.persistence.EntityManagerRequiredAnnotationBeanPostProcessor: 默认处理@Required注解
依赖注入的注解(下面这些注解都是使用BeanPostProcessor或者BeanFactoryPostProcessor的实现来处理的,所以如果在这两个接口的实现中使用了这些注解,是无效的.这两接口实现中的依赖装配必须在xml文件中,或者使用@Bean标注的方法来处理):
@Autowired: 只能指定是否是强制需要的,不能指定bean依赖的名称.@Required@Inject@Resource: 可指定bean的id名称,唯一标识注入一个bean依赖@Value@Qualifier: 由于@Autowired不能指定使用的bean名称,所以当有多个匹配的依赖时, 需要使用@Qualifier指定依赖注入时bean的名称.(可将多个bean指定为同一个@qualifier名称,注入时,使用集合接收), 当@Qualifier作用在一个自定义的注解上时,这此注解和@Qualifier拥有同样的作用
当使用Autowired注入一个类型集合的时候,如果类被@Order或者@Priority又或者实现了Ordered接口时,可对集合中元素进行排序
自定义qualifier注入注解配置:
    <bean id="customAutowireConfigurer"
        class="org.springframework.beans.factory.annotation.CustomAutowireConfigurer">
        <property name="customQualifierTypes">
            <set>
                <value>example.CustomQualifier</value>
            </set>
        </property>
    </bean>
类路径扫描和组件管理
@Configuration: 用来标注此类含有有个@Bean标注的方法.@ComponentScan: 标注扫描的包路径 (和@Configuration一起使用), 自动发现并注册被@Service,@Repository标注的类.@PropertySource: 标注属性文件的路径(.properties文件)@Import: 声明加载其他@Configuration标注的类@Profile@ImportResource@Lazy@Scope: 定义bean的类型.(prototype,singleton等), 可通过ScopeMetadataResolver接口自定义作用域范围.如果自定义作用域是非单例的,则需要设置scoped-proxy属性为interfaces(no, interfaces 和 targetClass 可选值),-
@Bean @Component: 被此注解标注的自定义注解,可与@Component具有相同的功能.@Service@Controller@Repository@RestController: 是@Controller和@ResponseBody的合成, 即注解@RestController的代码定义上,被@Controller和@ResponseBody同时标注
自定义组件扫描, 在@ComponentScan注解的includeFilters和excludeFilters中, 或者<context:component-scan/>的子元素<context:include-filter/>和<context:exclude-filter/>元素中, 可以定义需要扫描或过滤的组件.(如果在配置的属性中将use-default-filters="false设置为false,则@Component,
@Repository, @Service, or @Controller都不会生效)配置类型有如下5种:
- annotation : 基于注解扫描或过滤的组件,默认就是使用这个方式
- assignable : 基于类或注解的子类进行扫描
- aspectj : 基于切面扫描
- regex : 基于正则表达式扫描
- custom : 自定义的扫描实现(
org.springframework.core.type.TypeFilter实现)
默认情况下, @Component, @Repository, @Service, and @Controller 这些注解都会根据bean定义,为bean生成一个默认的名称. 可通过实现BeanNameGenerator接口,修改bean名称的生成策略.
使用 JSR330 标准注解
    <dependency>
        <groupId>javax.inject</groupId>
        <artifactId>javax.inject</artifactId>
        <version>1</version>
    </dependency>
标准注解和spring注解的关系:
@Inject和@Autowired类似.@Named: 和@Qualifier类似,@Named也可和@Componet使用类似@Singleton: 和@Scope("singleton")一样
@Bean如果被标注在一个@Component类中,如果类是懒加载的,则可能不能加载到?
AnnotationConfigApplicationContext不仅用来处理@Configuration标注的类,也可用来解释@Component标注的类,以及被 JSR-330 元数据注解的类.
当@Configuration注解的类作为输入时,类自己本身会注册为一个bean definition,并且所有声明的@Bean方法,也会注册为bean definition
在web环境中可使用AnnotationConfigWebApplicationContext来支持纯注解配置
    <web-app>
        <!-- Configure ContextLoaderListener to use AnnotationConfigWebApplicationContext
        instead of the default XmlWebApplicationContext -->
        <context-param>
            <param-name>contextClass</param-name>
            <param-value>
                org.springframework.web.context.support.AnnotationConfigWebApplicationContext
            </param-value>
        </context-param>

        <!-- Configuration locations must consist of one or more comma- or space-delimited
        fully-qualified @Configuration classes. Fully-qualified packages may also be
        specified for component-scanning -->
        <context-param>
            <param-name>contextConfigLocation</param-name>
            <param-value>com.acme.AppConfig</param-value>
        </context-param>

    <!-- Bootstrap the root application context as usual using ContextLoaderListener -->
        <listener>
            <listener-class>org.springframework.web.context.ContextLoaderListener</listener-class>
        </listener>

    <!-- Declare a Spring MVC DispatcherServlet as usual -->
        <servlet>
            <servlet-name>dispatcher</servlet-name>
        <servlet-class>org.springframework.web.servlet.DispatcherServlet</servlet-class>

    <!-- Configure DispatcherServlet to use AnnotationConfigWebApplicationContext
    instead of the default XmlWebApplicationContext -->
        <init-param>
            <param-name>contextClass</param-name>
            <param-value>
                org.springframework.web.context.support.AnnotationConfigWebApplicationContext
            </param-value>
        </init-param>

    <!-- Again, config locations must consist of one or more comma- or space-delimited
    and fully-qualified @Configuration classes -->
        <init-param>
            <param-name>contextConfigLocation</param-name>
            <param-value>com.acme.web.MvcConfig</param-value>
        </init-param>
    </servlet>

    <!-- map all requests for /app/* to the dispatcher servlet -->
        <servlet-mapping>
            <servlet-name>dispatcher</servlet-name>
            <url-pattern>/app/\*</url-pattern>
        </servlet-mapping>
    </web-app>
-
@Description : 用来做bean描述
-
@Profile:ctx.getEnvironment().setActiveProfiles("profile1", "profile2");指定使用的bean配置, 只会启用@Profile("profile1")和@Profile("profile2")标注的bean以及配置.(@Profile("default")标注的类,在未指定时,默认启用) -
@PropertySource: 指定环境变量中的属性配置 例如@Configuration中指定:@PropertySource("classpath:/com/myco/app.properties"),${...}占位符也支持.
类加载时间获取: @EnableLoadTimeWeaving或者<context:load-time-weaver/> (具体使用可查看LocalContainerEntityManagerFactoryBean的文档), 在JPA(Java Persistence API)中可能会用到.
ApplicationContext的能力增强
- 通过
MessageSource支持i18n风格的消息. - 通过
ResourceLoader支持资源的访问. - 通过实现
ApplicationListener和ApplicationEventPublisher支持向bean事件处理号发送. - 通过
HierarchicalBeanFactory接口实现多个上下文加载.使每一部分只关注在自己的那一块信息.(例如在web层的实现)
MessageSource
上下文加载时,默认查找id名为messageSource的MessageSource实现.如果没找到,则使用DelegatingMessageSource空实现,spring支持两种MessageSource的实现ResourceBundleMessageSource和StaticMessageSource
spring事件
内置默认事件:
- ContextRefreshedEvent
- ContextStartedEvent
- ContextStoppedEvent
- ContextClosedEvent
- RequestHandledEvent
可通过继承ApplicationEvent来自定义事件:
    public class BlackListEvent extends ApplicationEvent {
        private final String address;
        private final String test;

        public BlackListEvent(Object source, String address, String test) {
            super(source);
            this.address = address;
            this.test = test;
        }
        // accessor and other methods...
    }
RAR部署可考虑使用SpringContextResourceAdapter
参考
http://docs.spring.io/spring/docs/current/spring-framework-reference/htmlsingle/#beans
